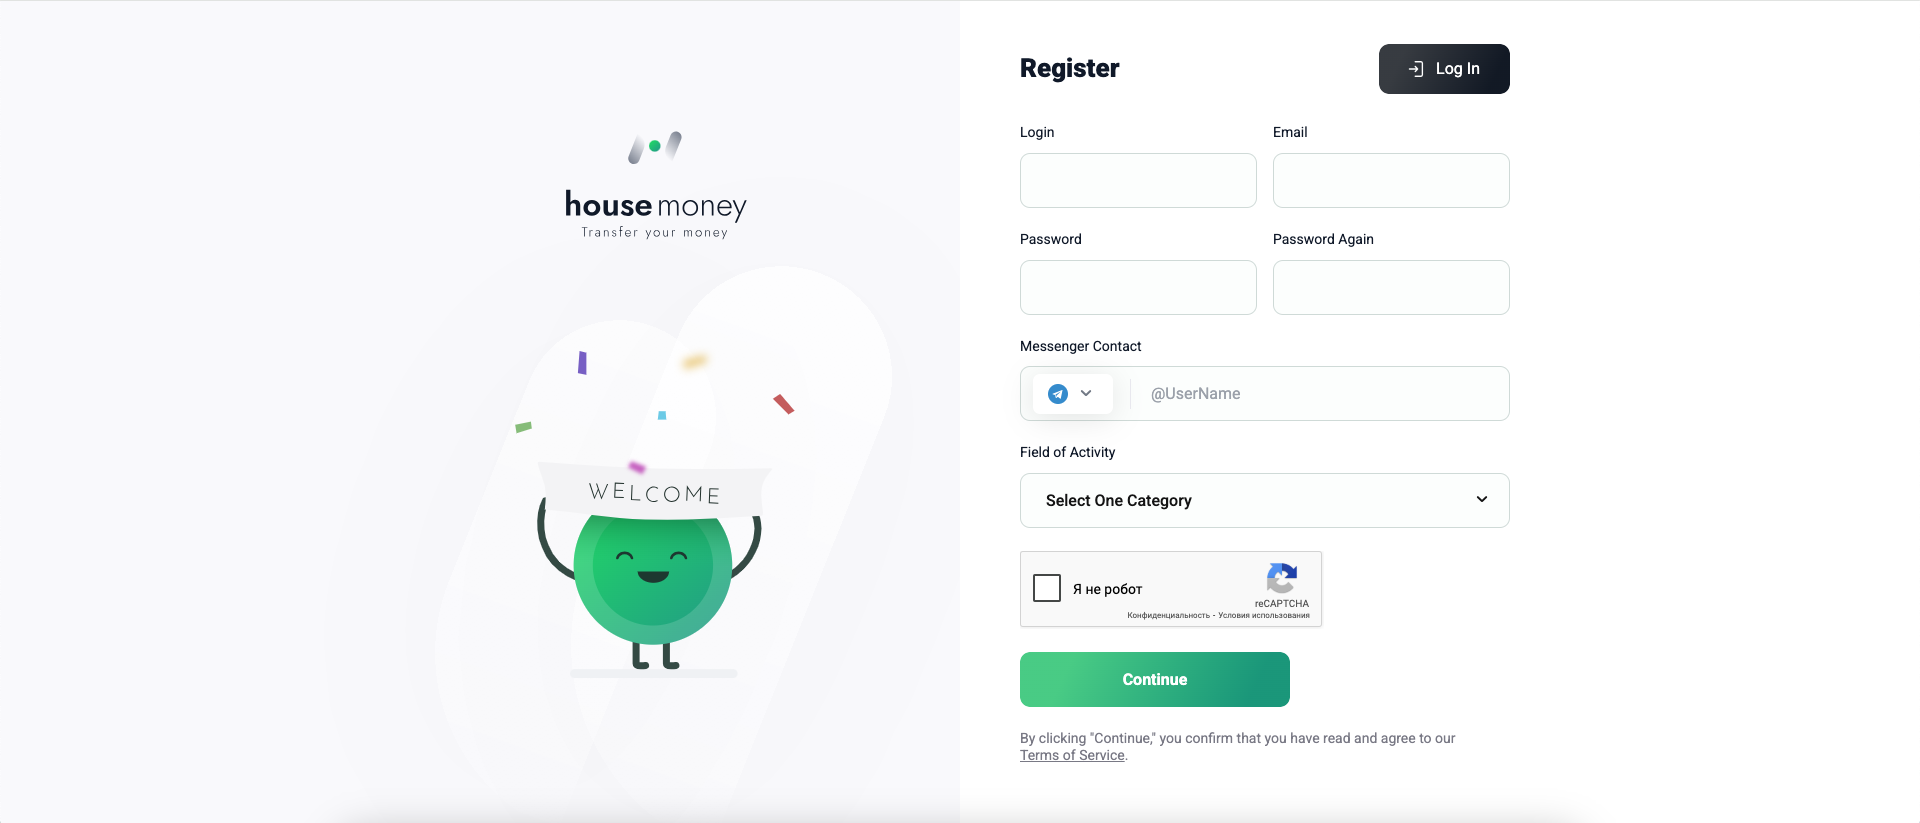
Registering with the System
Creating an account is your first step to using Pay2.House. The process takes just a few minutes.
-
Visit the Registration Page
-
Complete the Form
Provide the following information:
- Username — the name displayed to other users and in service emails.
- Email — a valid email address for receiving a verification code.
- Password — create a secure password and confirm it.
- Messenger — select Telegram and enter your username (e.g., @username).
- Occupation — choose an option to access relevant features and offers.
-
Confirm You’re Not a Robot
- Complete the CAPTCHA (e.g., select images) and check the box.
-
Click “Continue”
- If all fields are correct, you’ll be directed to your account.
- If there are errors, the system will highlight what needs to be fixed.
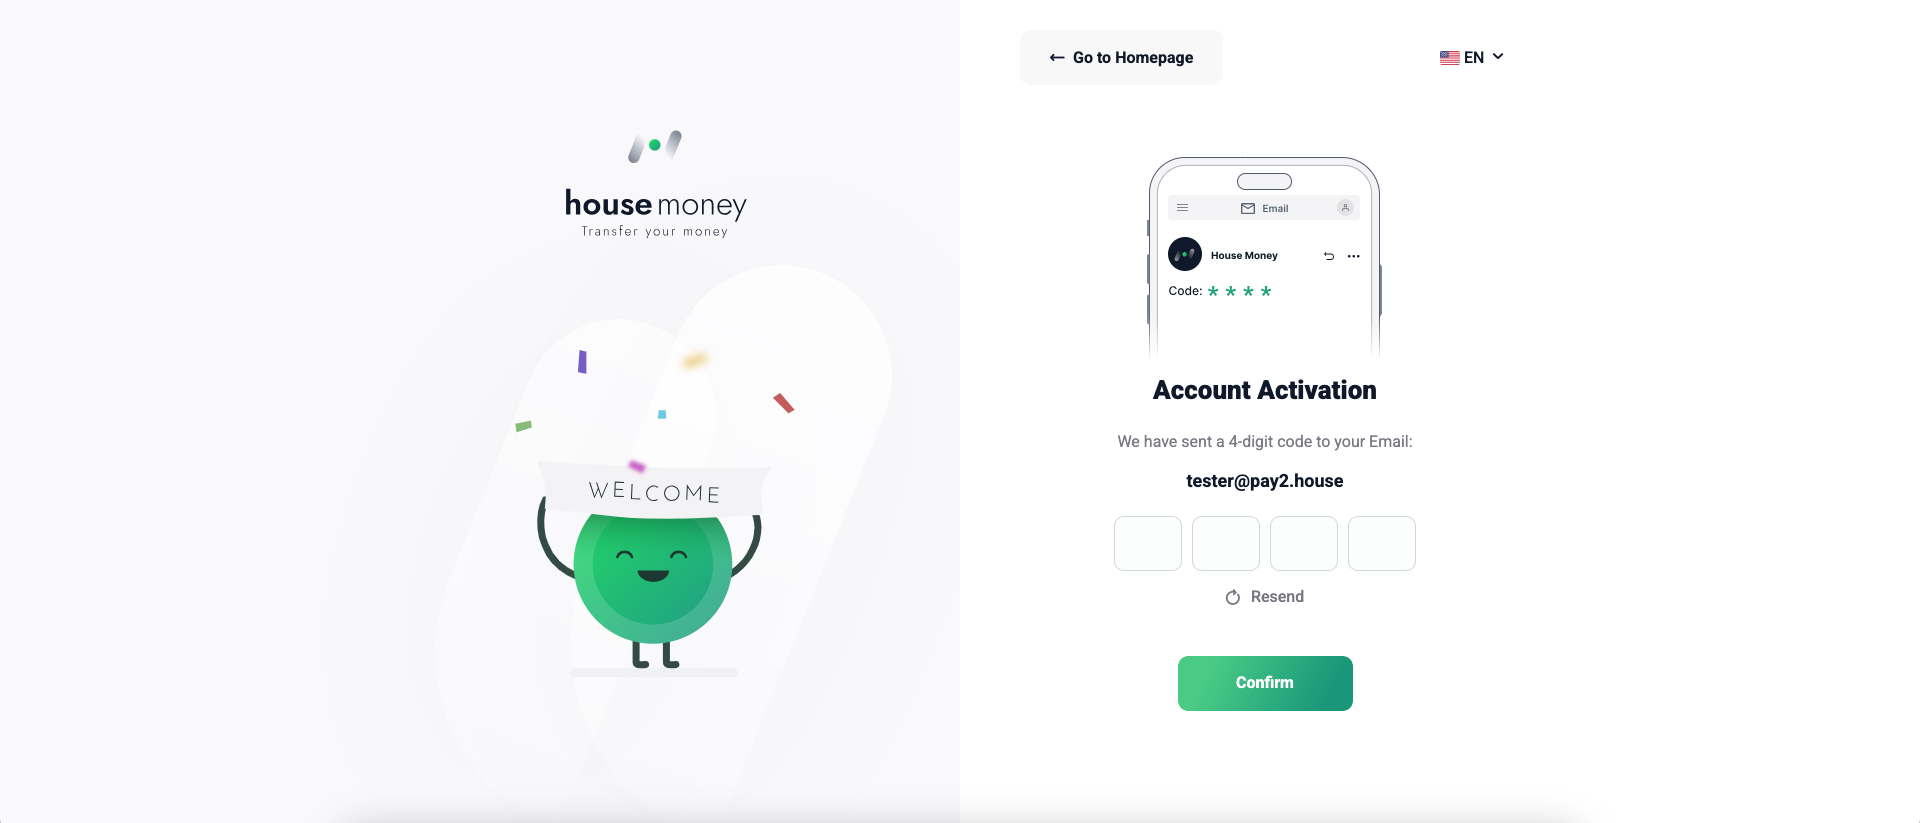
Verifying Your Email
After registering, verify your email address. This is required for security and to receive notifications.
-
Check Your Inbox
- A 4-digit code will be sent to the email you provided.
- If you don’t see the email, check your “Spam” folder.
- Click “Resend” to receive a new code if needed.
-
Enter the Code
- Go to the activation page and input the code from the email.
- If the code is correct, you’ll proceed to the next step.
-
Click “Verify”
- Once the code is verified, your account will be activated.
- You’ll be automatically redirected to your account.
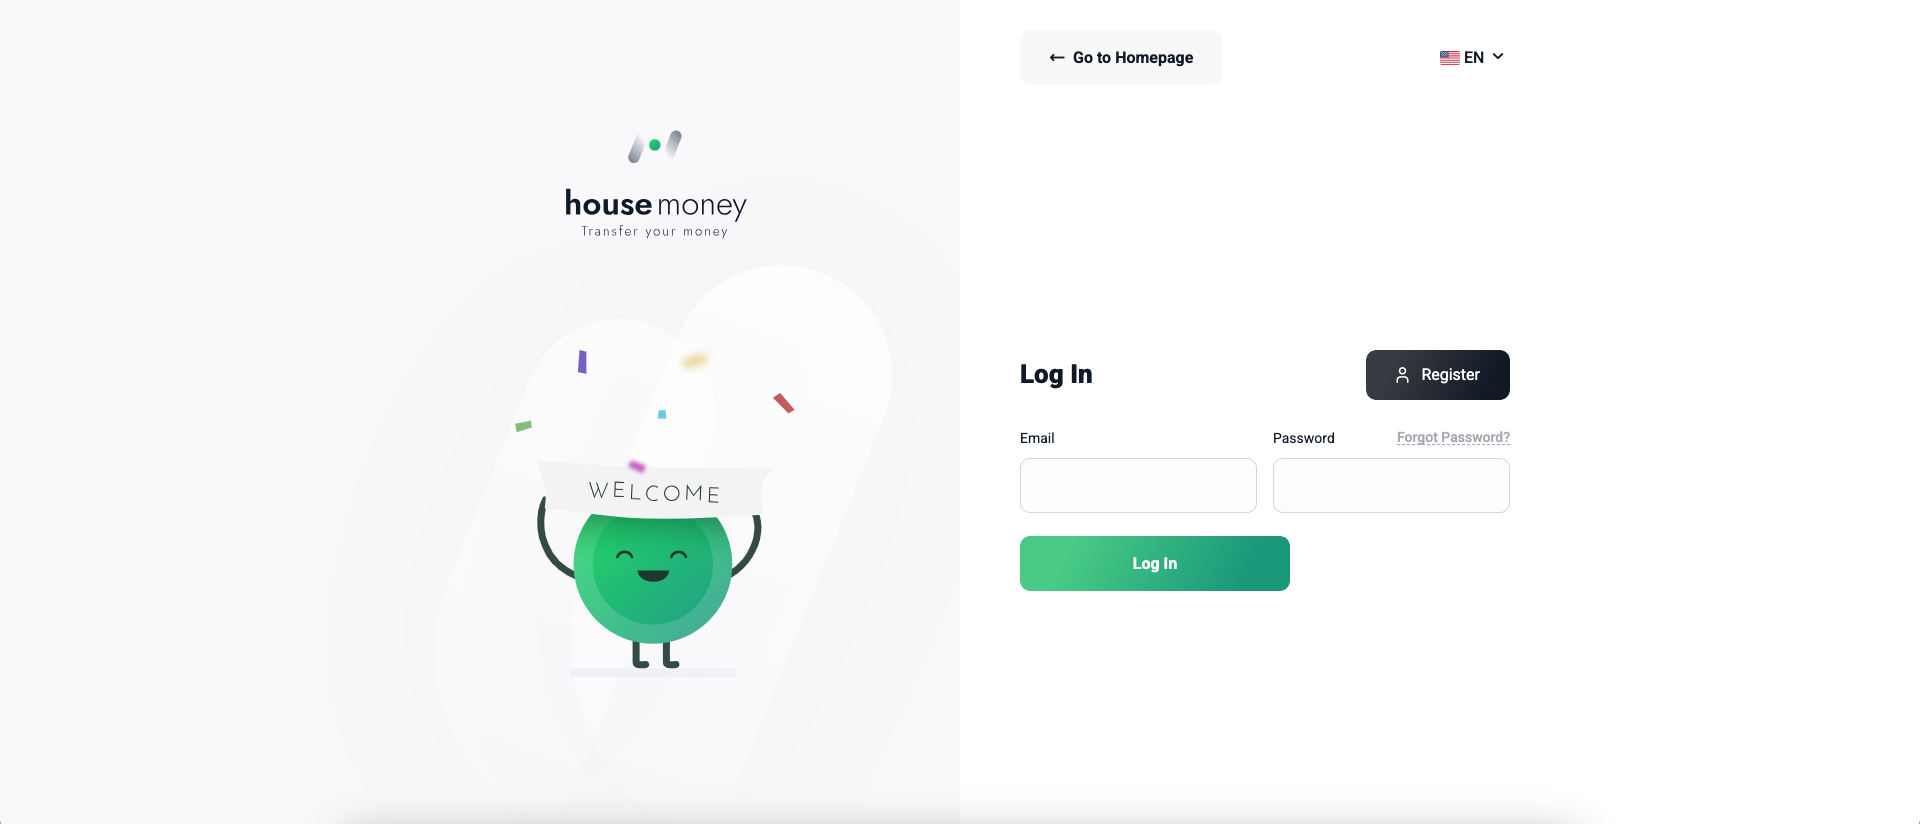
Logging into Your Account
After activation, you can log in and start using Pay2.House.
-
Go to the Login Page
-
Enter Your Details
- Provide the email used during registration.
- Enter your password.
-
Click “Log In”
- Upon successful login, you’ll access your account.
- If you forgot your password, click “Forgot Password?” to reset it.
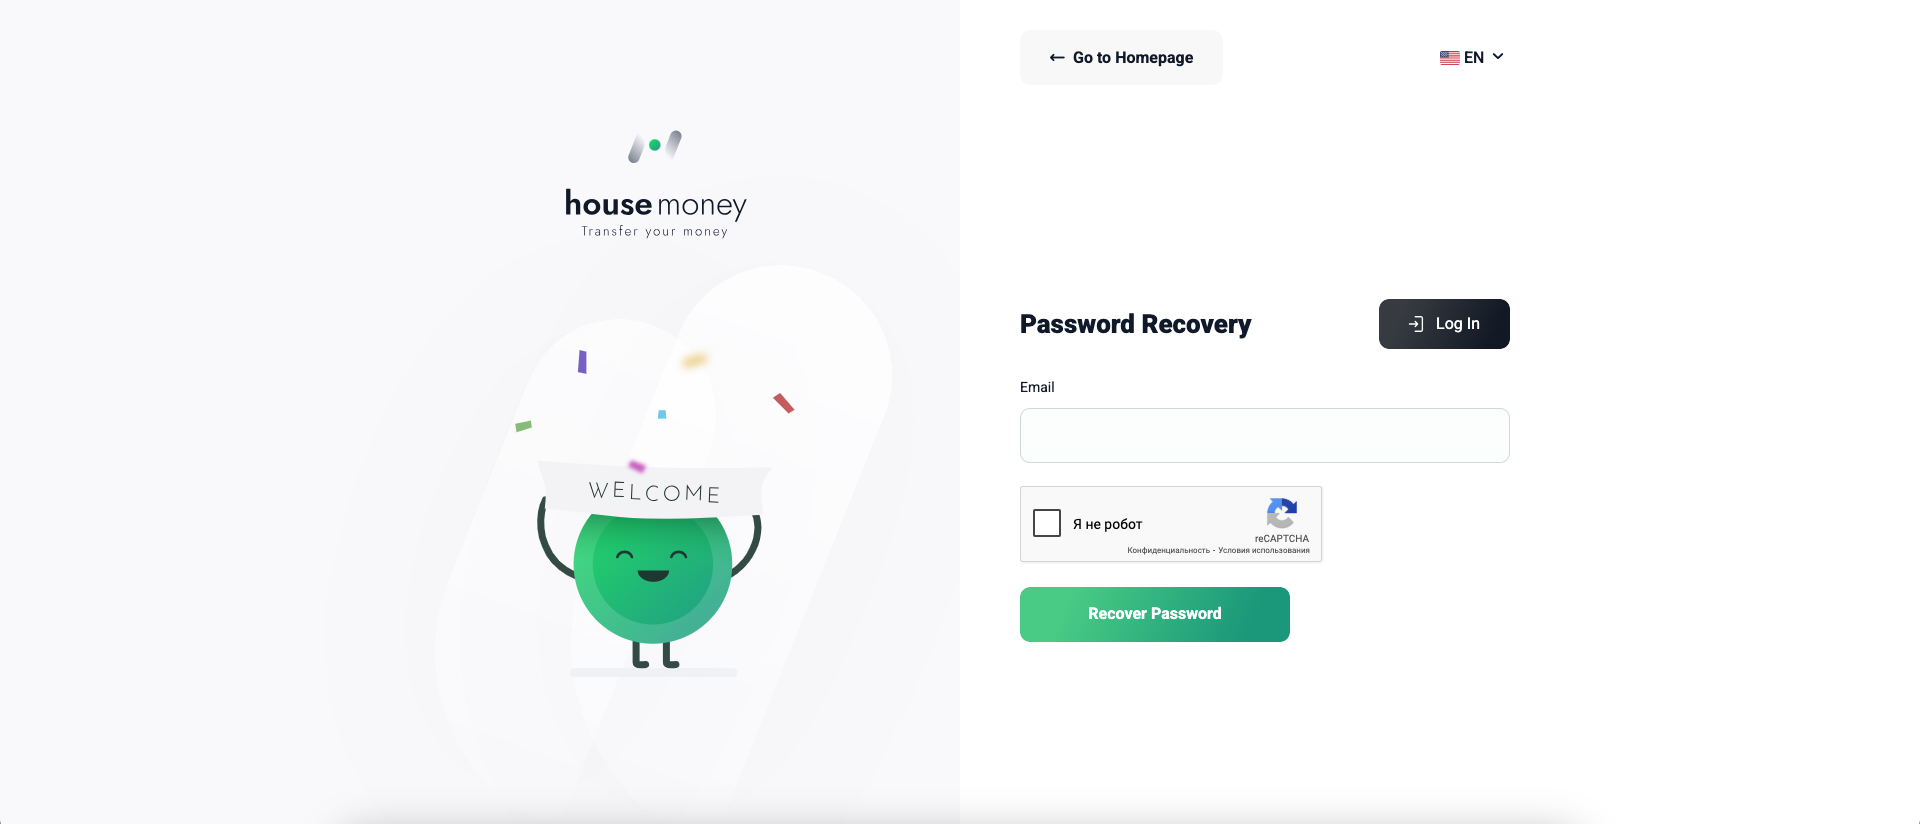
Password Recovery
Forgot your password? No problem. You can reset it and create a new one in a few steps.
-
Request a Password Reset
- Go to: https://pay2.house/password_recovery
- Enter the email used for registration.
- Complete the CAPTCHA and click “Recover Password”.
- A verification code will be sent to your email.
-
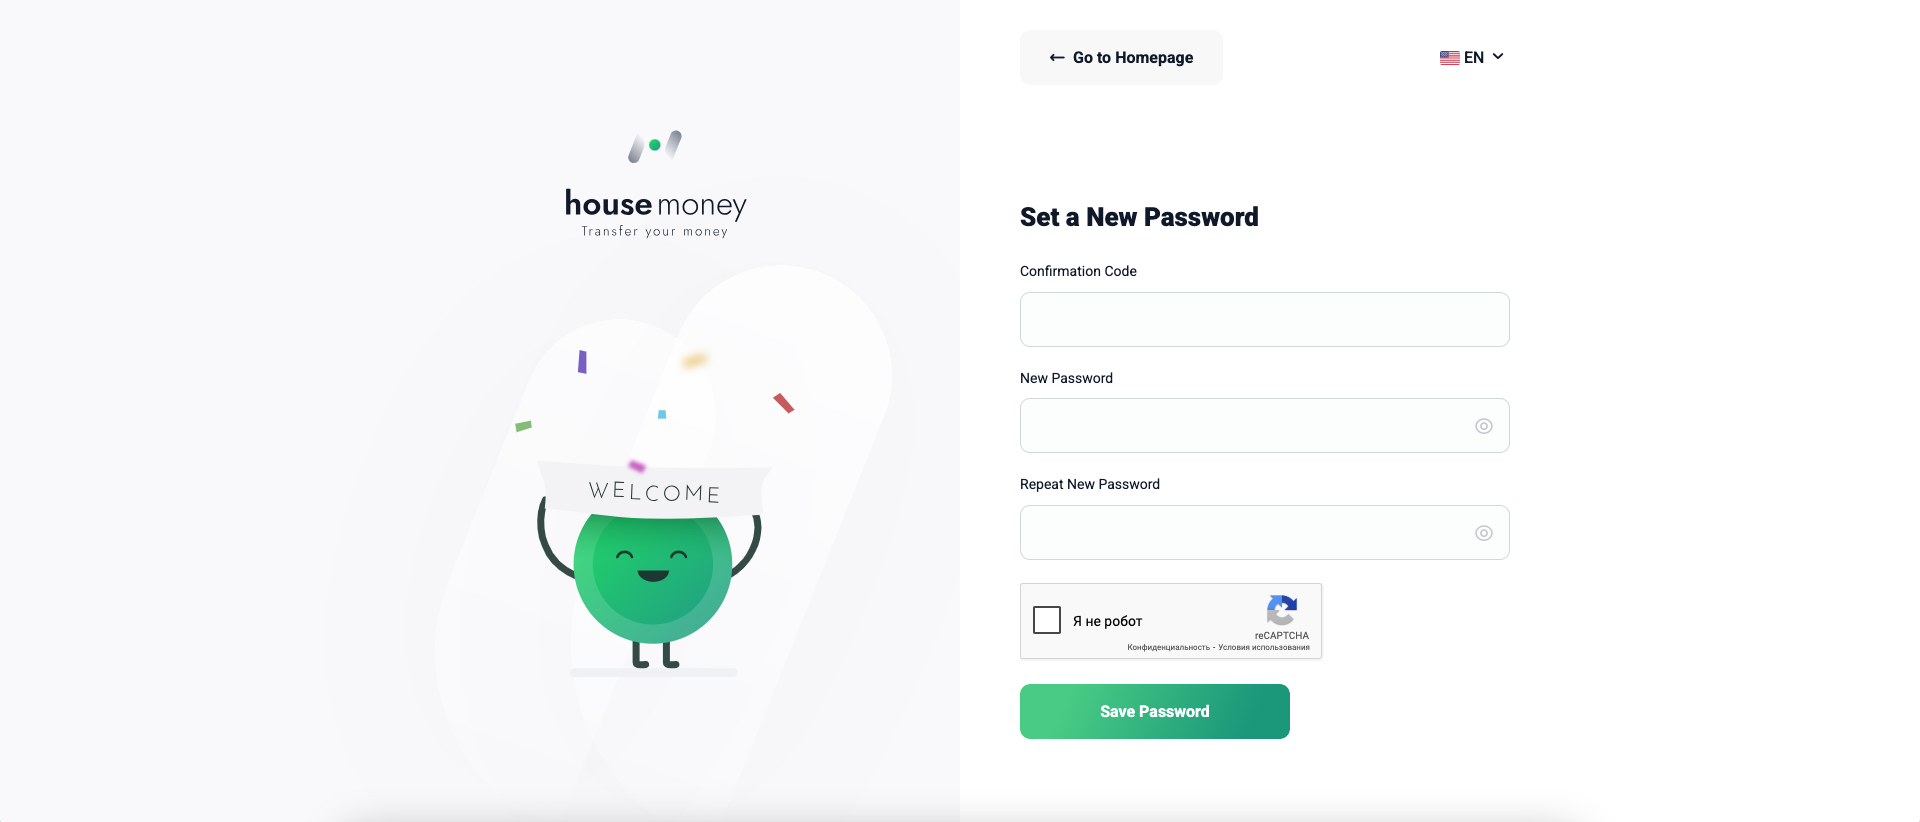
Create a New Password
- Enter the code from the email on the recovery page.
- Set a new password and confirm it.
- Verify via CAPTCHA and click “Save Password”.
You can now log in with your new password.
Personal Account
Dashboard
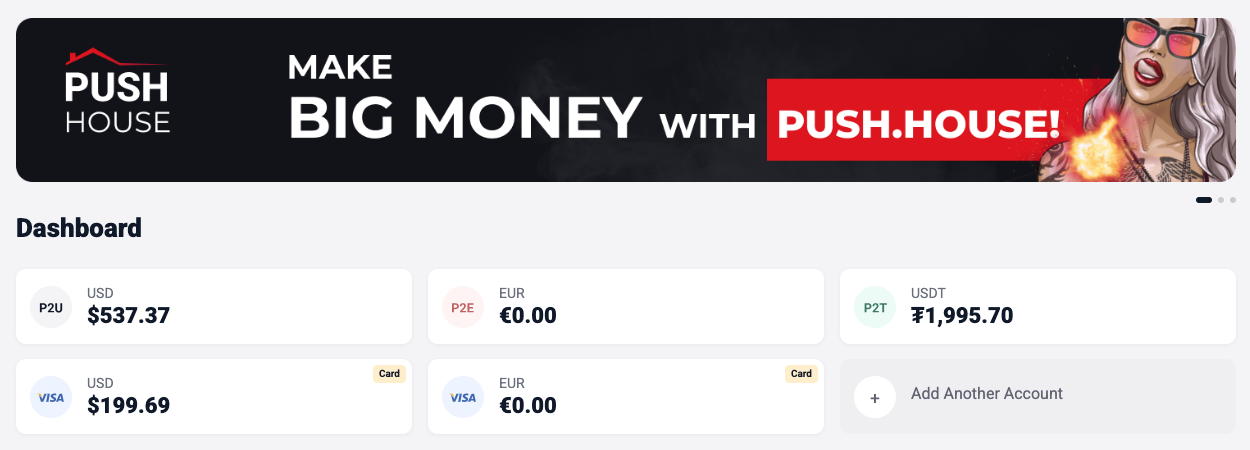
After logging in, you’ll see the Dashboard, your control panel showing balances, transactions, activity, and access to key features.
-
Accounts and Balances
- The top section displays your funds in USD, EUR, and USDT.
- Each account is labeled: P2U, P2E, P2T — internal currencies for dollars, euros, and cryptocurrency.
- Your current balances are shown below.
- Click “Add Another Account” to create additional internal accounts.
-
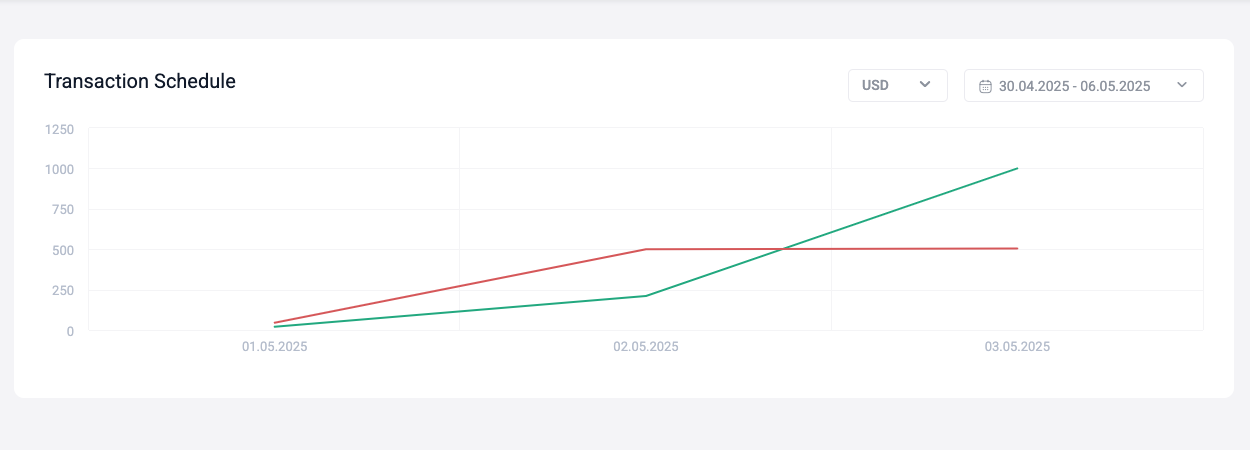
Transaction Chart
- A chart below displays your transaction activity.
- Select a currency and time period to view.
-
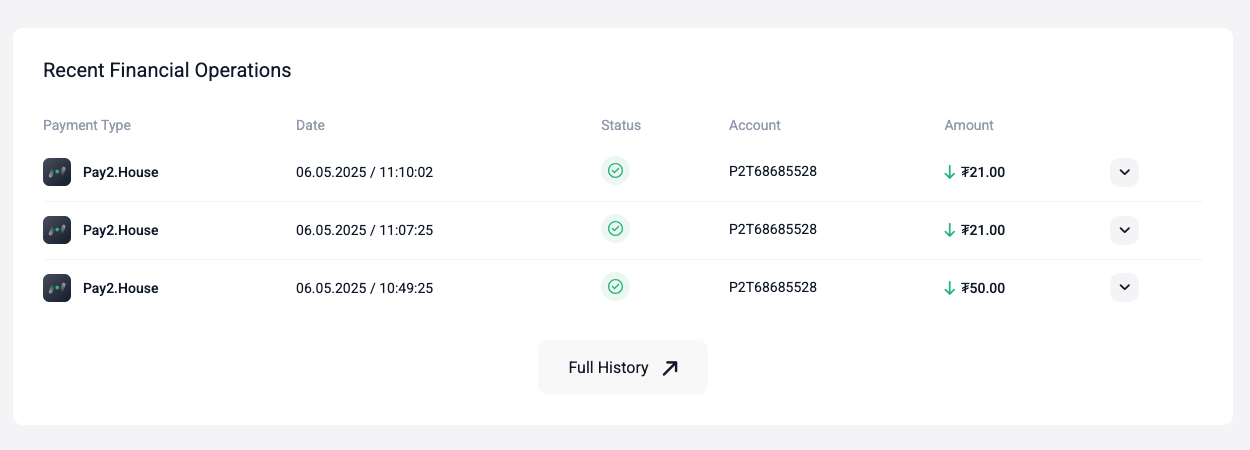
Recent Transactions
- A list of your latest transactions.
- If there’s no activity, a “Nothing Found” message will appear.
-
“Accounts” Widget (Right Side)
- Shows all active accounts.
- Scroll through them using left/right arrows.
- Each account offers quick actions: Fund, Transfer, Transaction History.
-
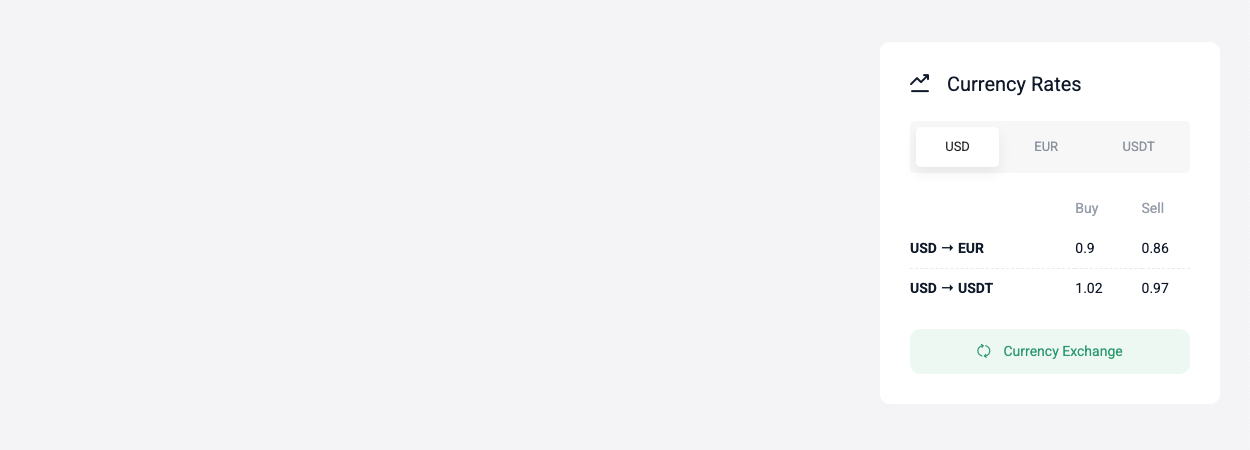
“Exchange Rates” Widget
- Current exchange rates for USD, EUR, and USDT.
- Click “Exchange Currency” to convert funds.
-
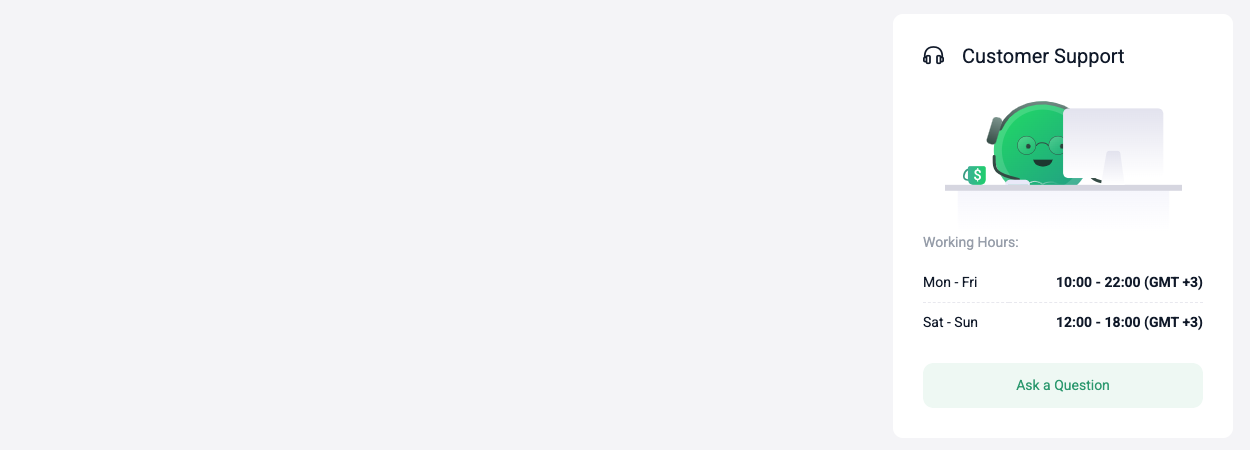
“Support” Widget
- Displays support team hours.
- Includes a “Ask a Question” button to contact support quickly.
-
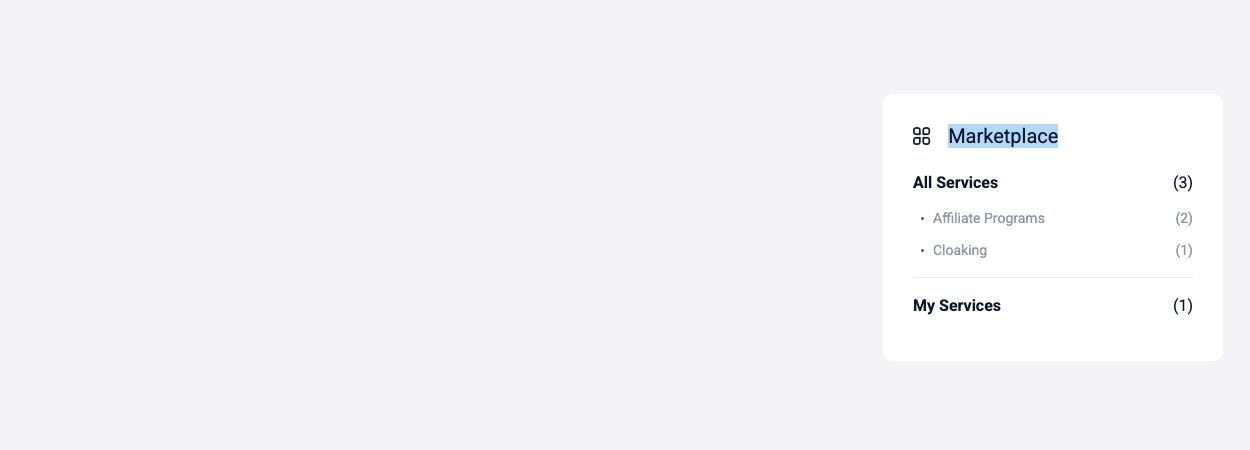
“Marketplace” Widget
- A list of external services and partner programs.
- Connect additional tools here.
Personal Account
Profile Settings
Update personal details, enhance security, and manage notifications in this section.
-
Personal Information
- Upload an avatar (PNG or JPG, up to 500 KB).
- Update: username, first name, last name, date of birth, occupation.
- Add a contact, e.g., Telegram username.
- Your verification status is shown on the right. If unverified, follow the instructions provided.
-
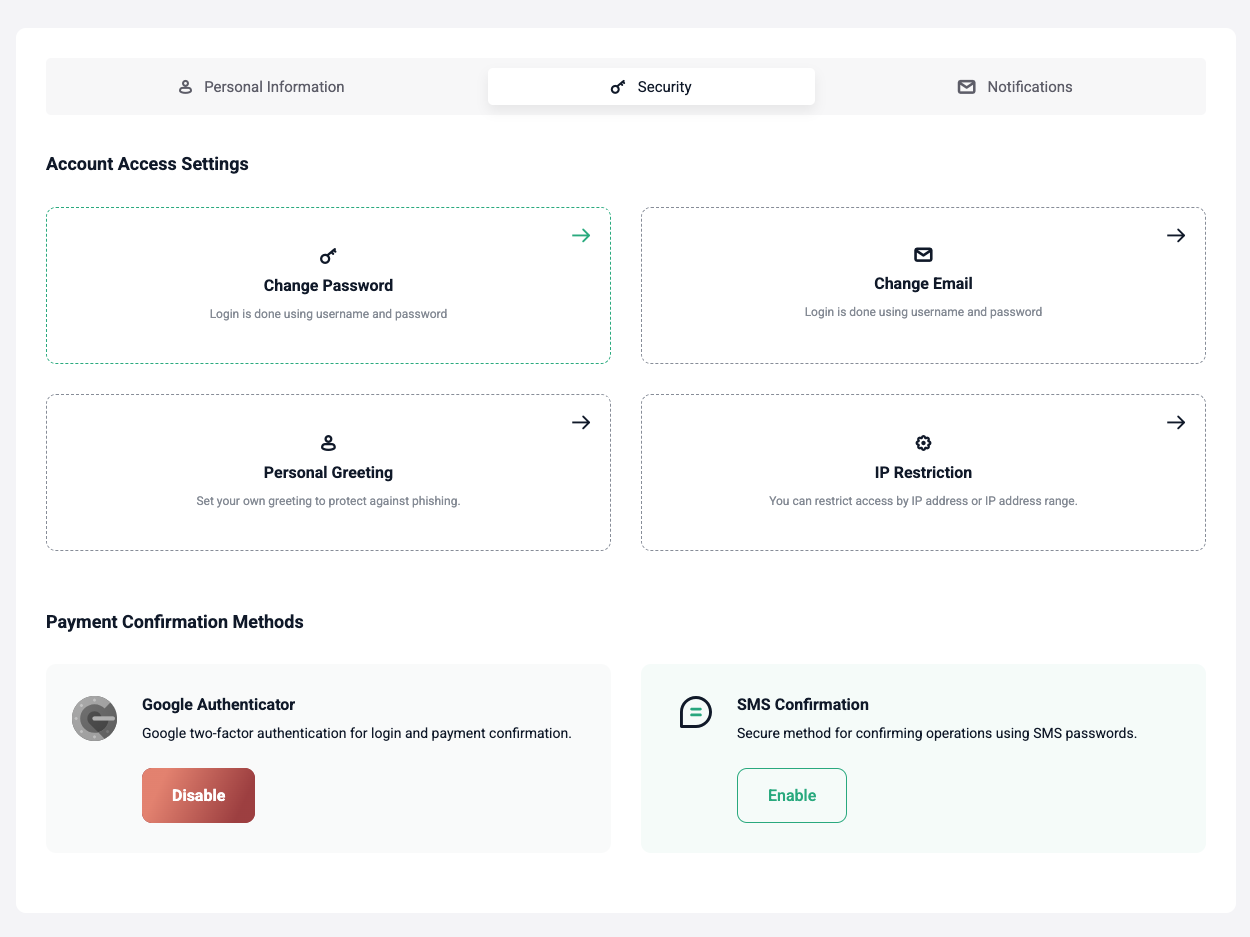
Security
- Change Password — set a new login password.
- Change Email — update the email linked to your account.
- Personal Greeting — a phrase shown at login to prevent phishing.
- IP Restriction — limit logins to specific IP addresses.
- Payment Verification — enable two-factor authentication via Google Authenticator or SMS.
-
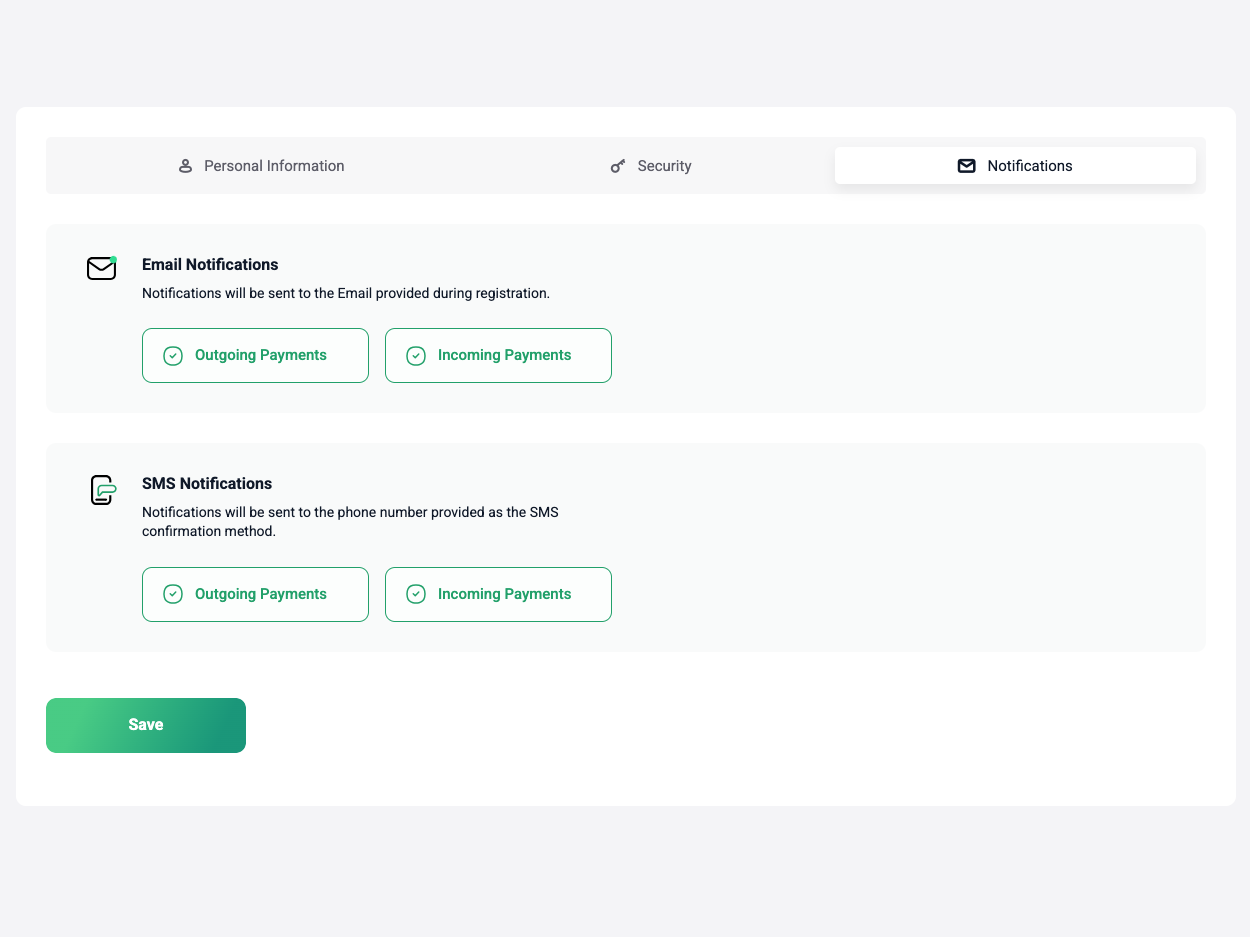
Notifications
- Set up Email and SMS notifications for incoming/outgoing payments.
- Notifications go to the email or phone number in your profile.
- Enable or disable each notification type individually.
Personal Account
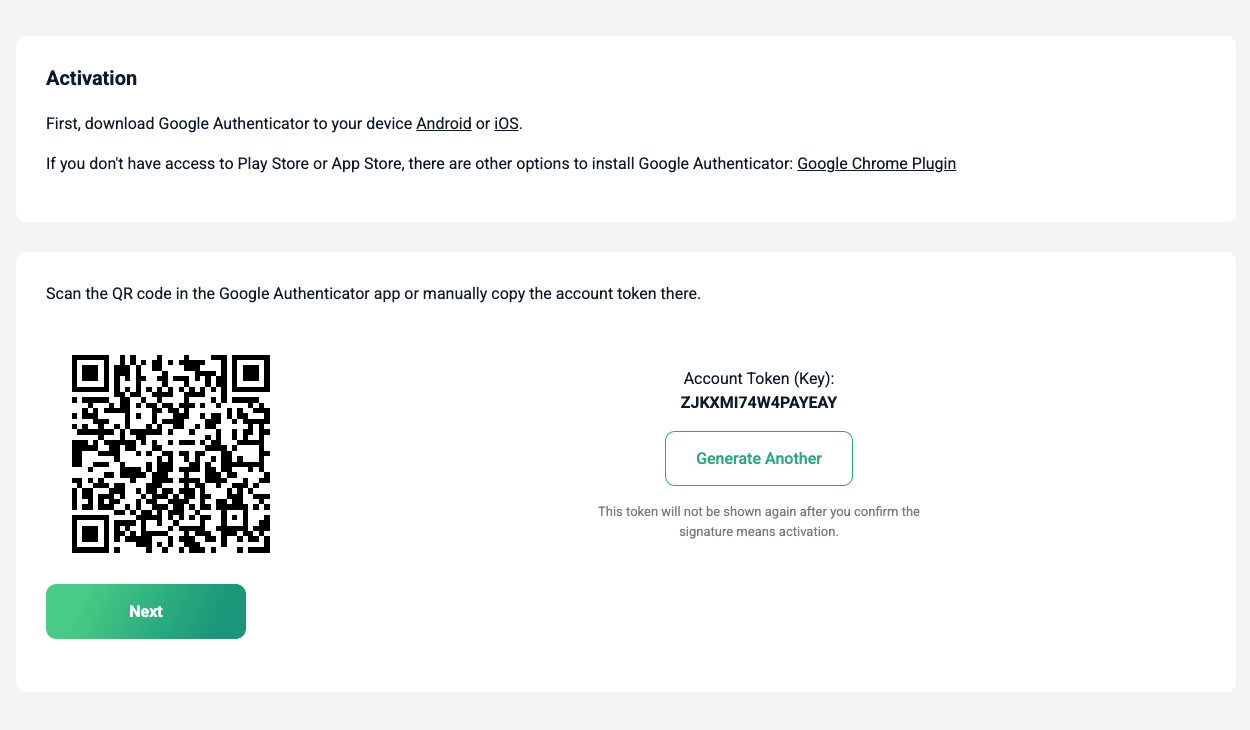
Google Authenticator Setup
Increase account security with two-factor authentication via Google Authenticator. This protects logins and transactions, even if your password is compromised.
-
Install the App
-
Generate a Key
- Click “Connect” to view a QR code and account key.
- Scan the QR code with Google Authenticator or enter the key manually.
- Save the key — it’s shown only once. You can generate a new one if needed.
-
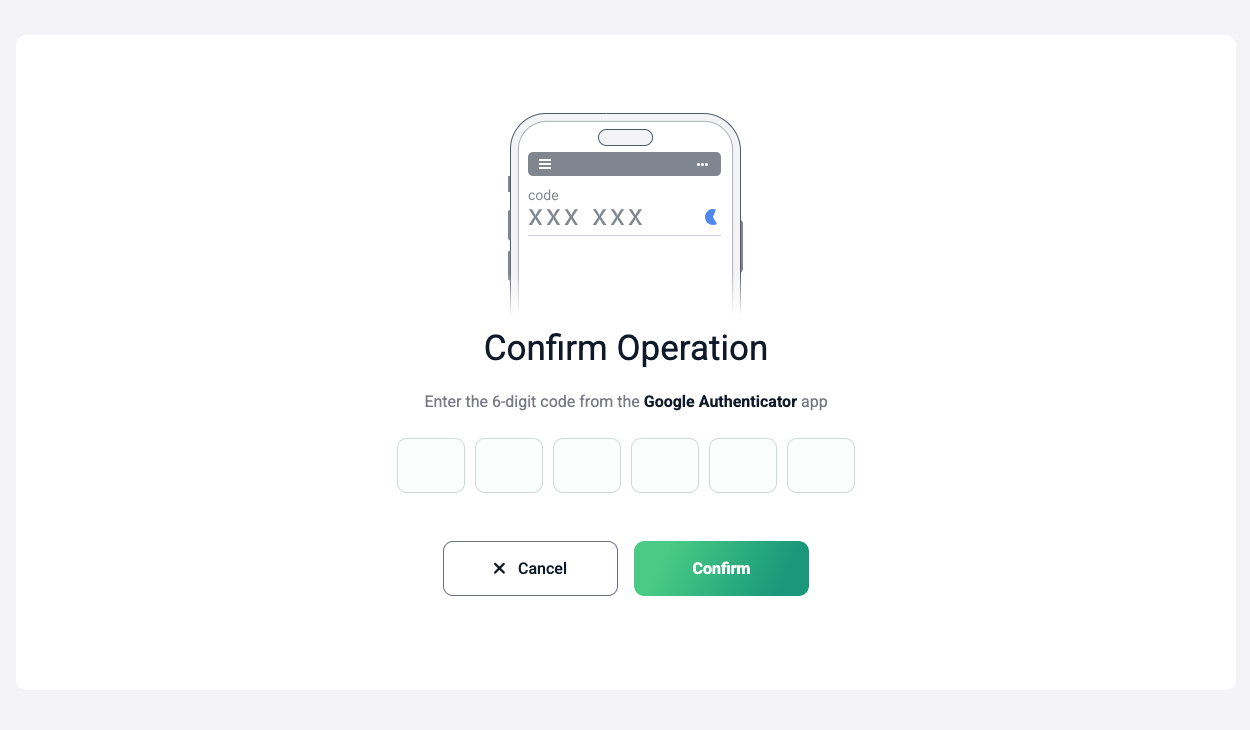
Confirm Setup
- Enter the 6-digit code from the app on the confirmation page.
- Click “Confirm” to activate.
-
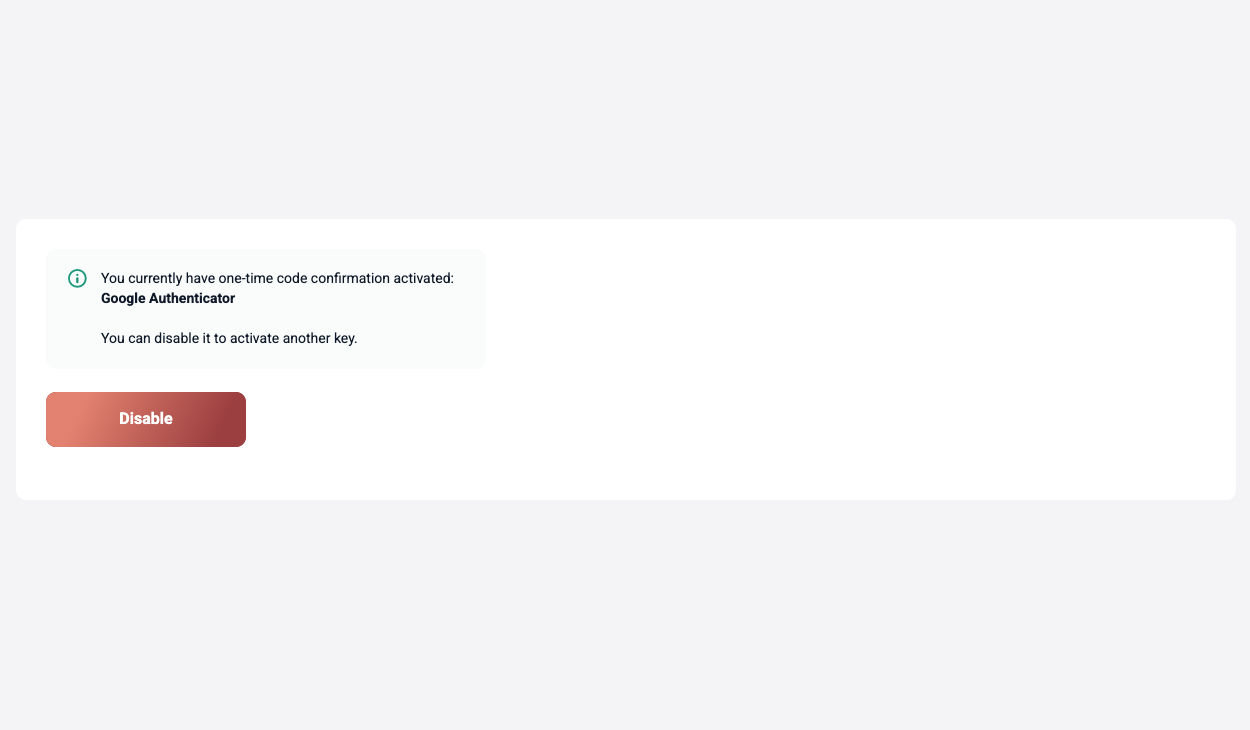
Setup Complete
- Logins and transactions will now require a Google Authenticator code.
- You can disable 2FA anytime and re-enable it later.
Personal Account
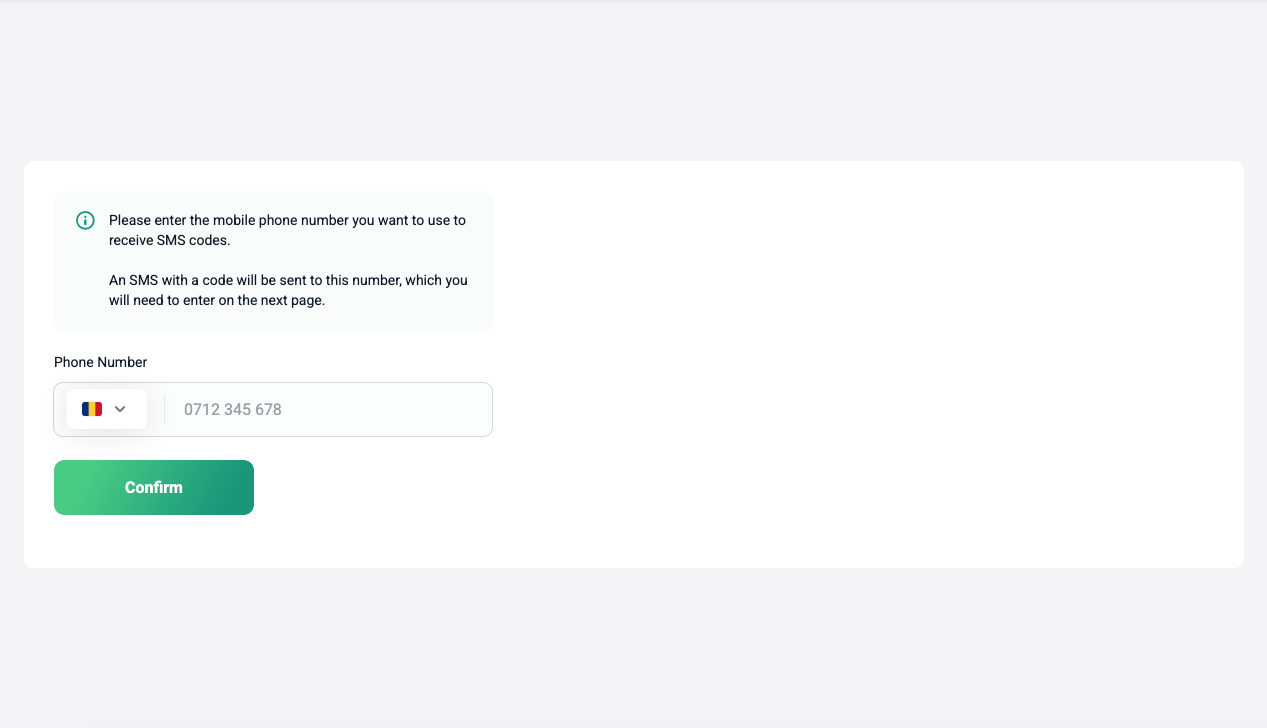
SMS Verification
Enable verification for key actions (e.g., logins or transfers) with an SMS code sent to your phone.
-
Enter Phone Number
- Provide the phone number for receiving SMS codes.
- Verify the number is correct and click “Confirm”.
-
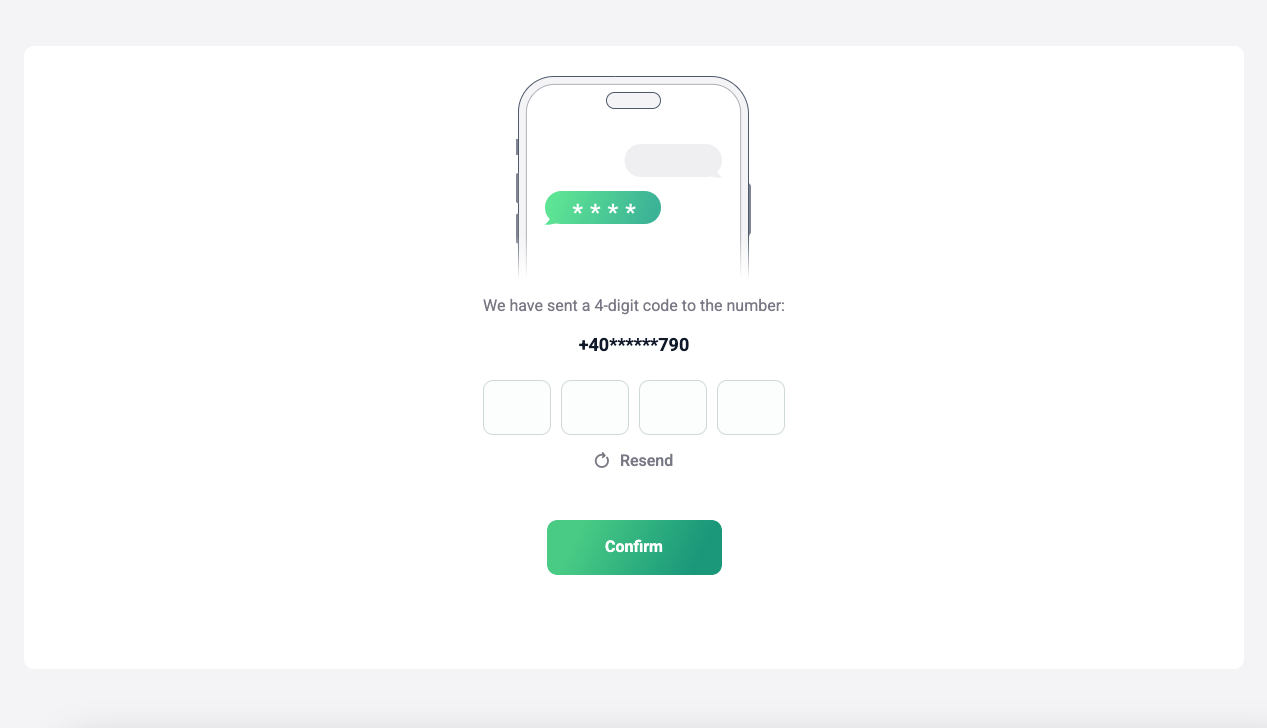
Confirm Setup
- A 4-digit code will be sent to your phone.
- Enter the code in the provided field and click “Confirm”.
- If the code doesn’t arrive, request a resend.
-
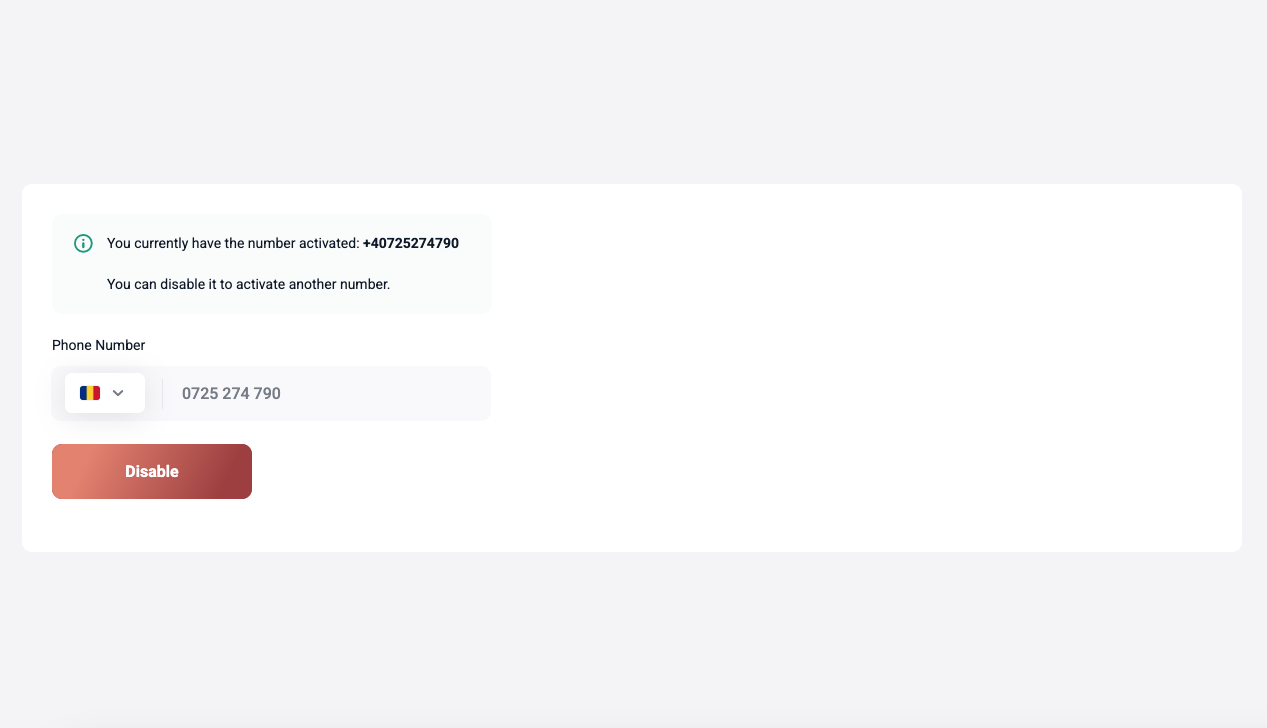
Setup Complete
- Once verified, your phone number will secure transactions.
- A message will confirm the active phone number.
- You can unlink the number and add a new one anytime.
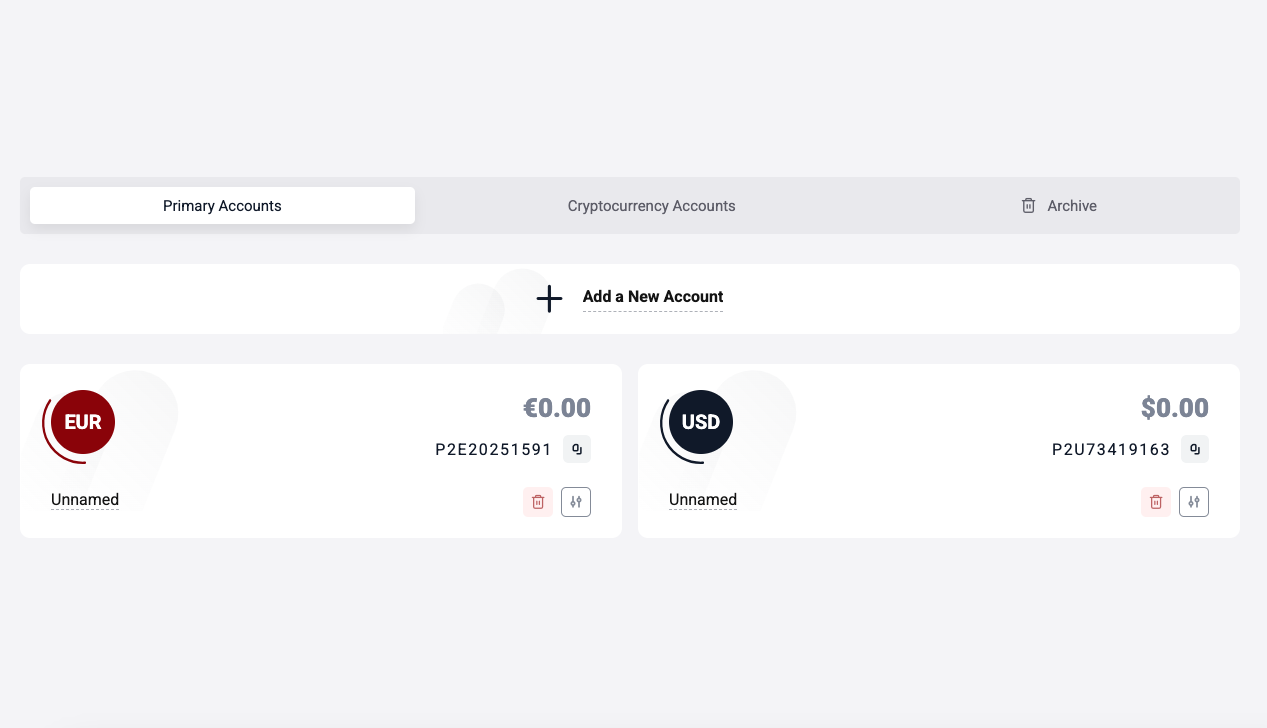
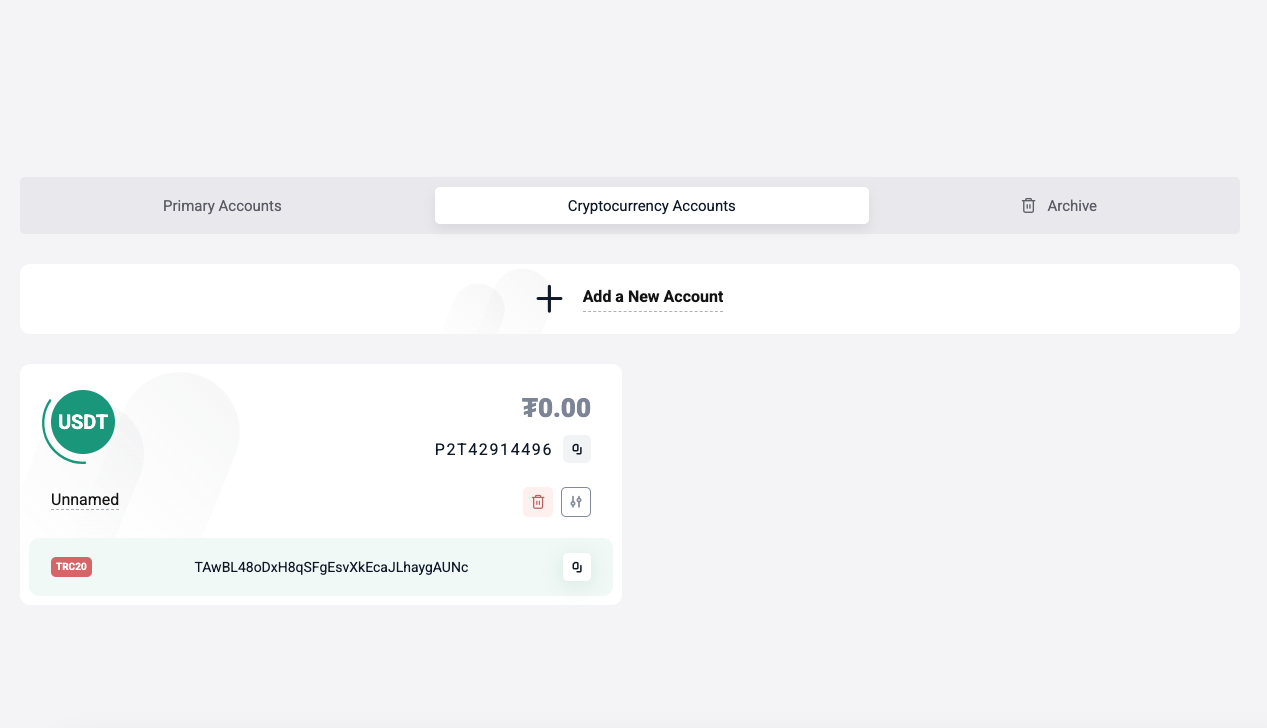
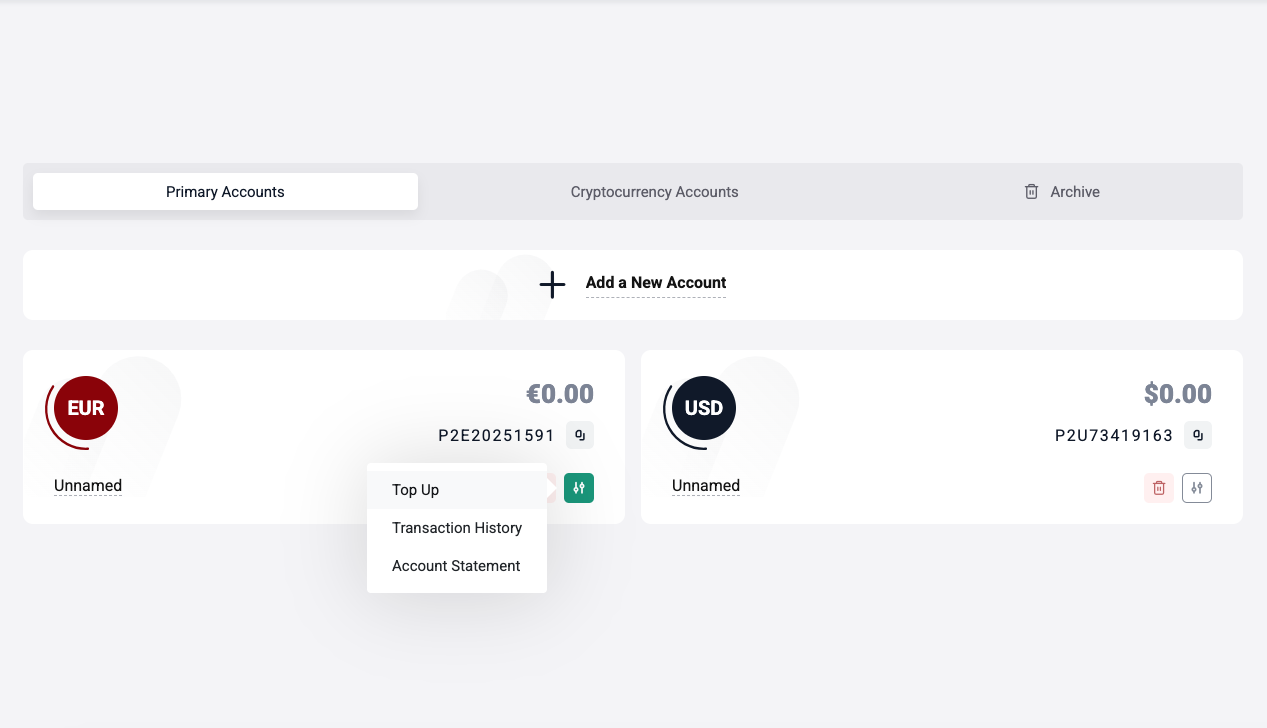
My Accounts
Account Types and Limits
Manage your accounts here: open new ones, view active accounts, or access archived ones.
-
Account Types
- Main Accounts — in USD and EUR for platform operations.
- Cryptocurrency Accounts — e.g., USDT (TRC-20) for crypto transfers.
- Archive — stores unused accounts, which can be restored if needed.
-
Account Creation Limits
- You can create up to 10 accounts by default.
- Complete verification to remove this limit.
- Check verification status in Profile Settings.
-
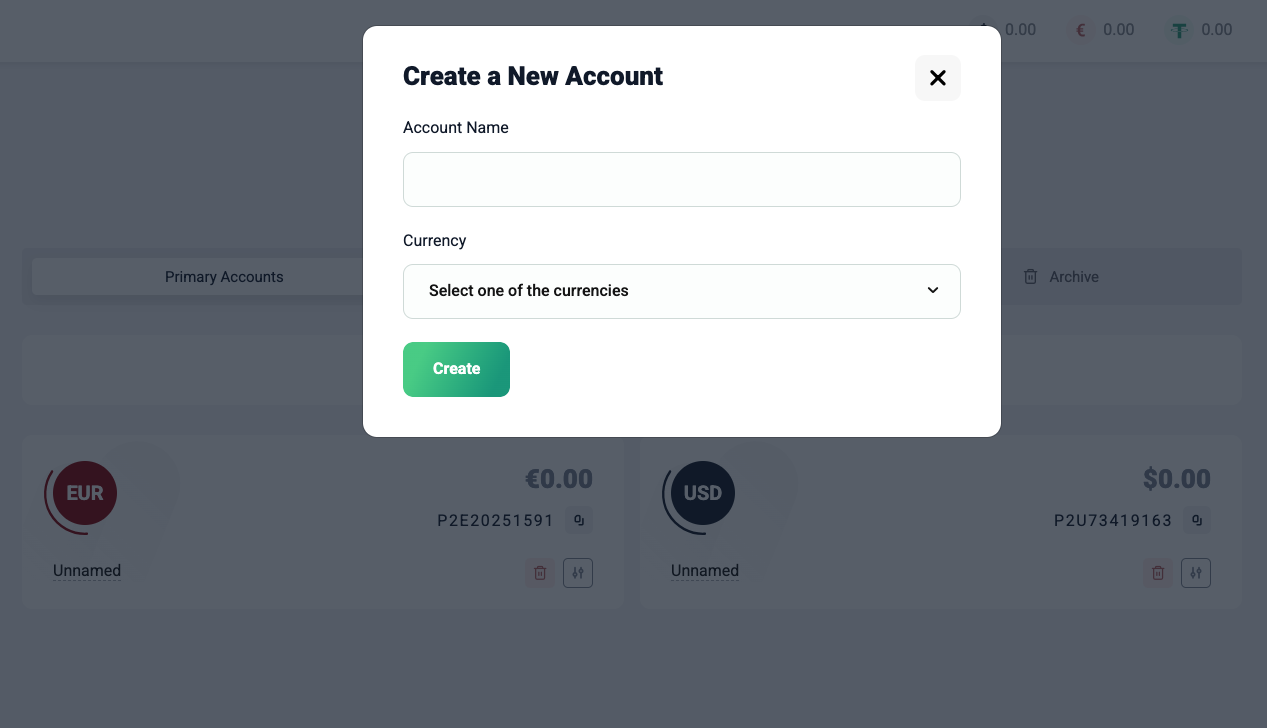
Open a New Account
- Click “Add New Account”.
- Enter an optional name and select a currency.
- Click “Create” to add the account to your list.
-
Quick Account Actions
Each account offers:
- Fund — choose funding options.
- Transaction History — view all transactions.
- Account Statement — generate a report.
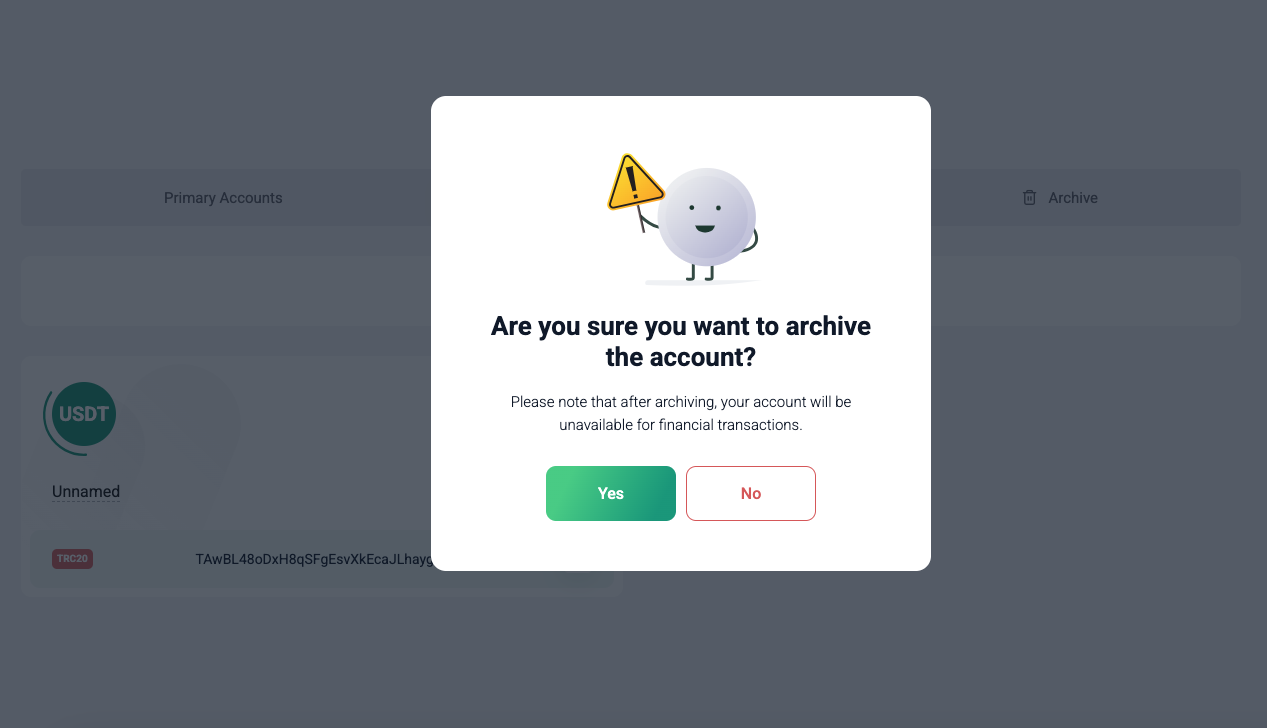
- Archive — move unused accounts to the archive.
-
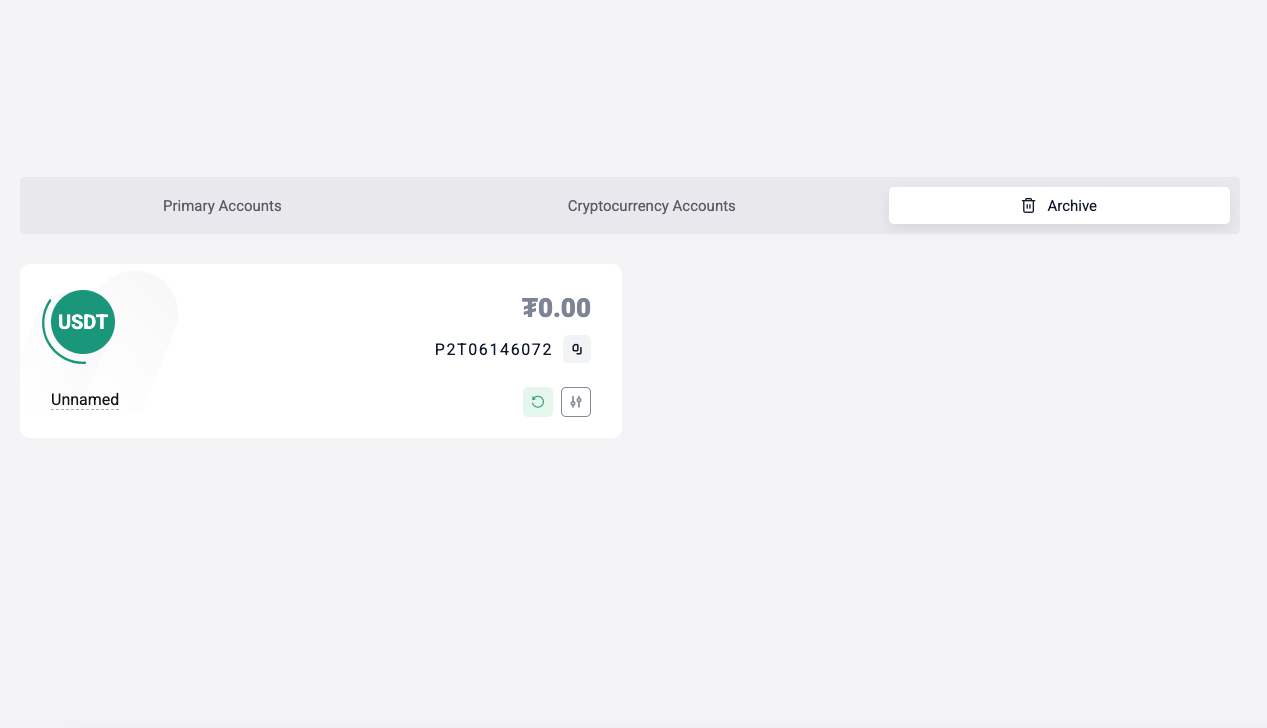
Managing the Archive
- Archived accounts cannot be used for transactions.
- Restore an archived account to active status with one click.
My Accounts
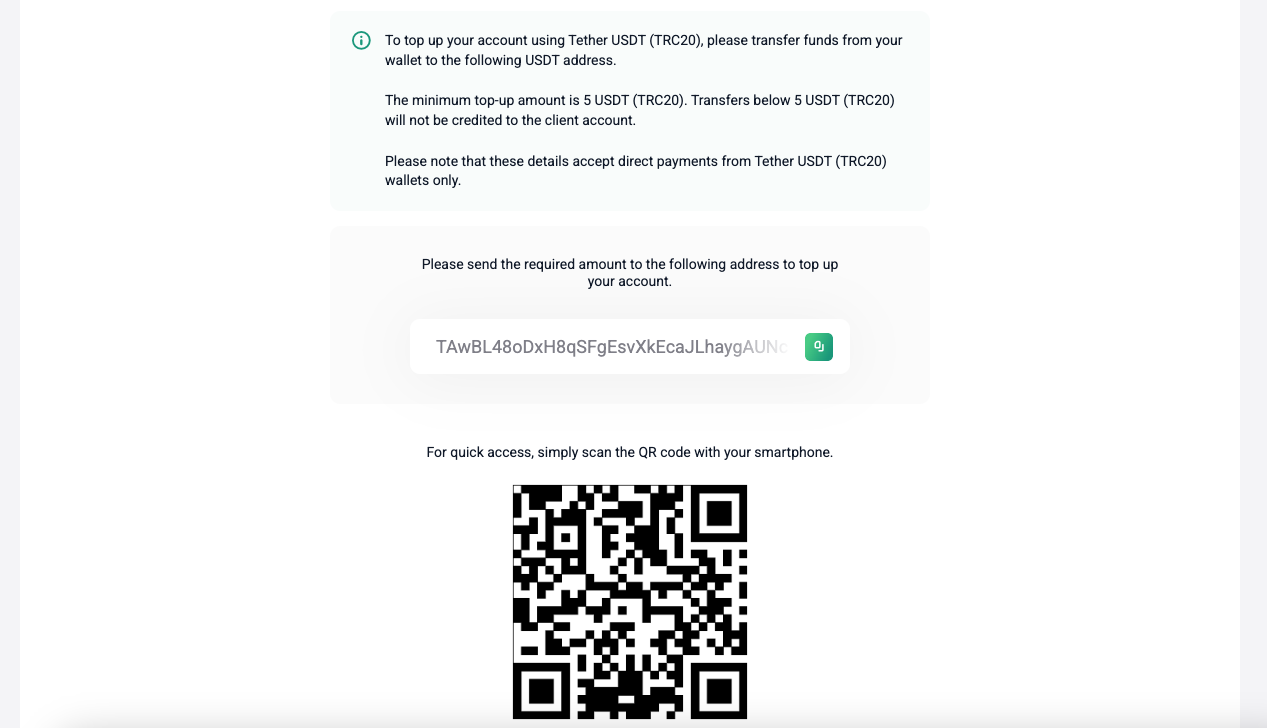
Funding a Cryptocurrency Account (USDT)
Fund your crypto account to use funds for transfers or other operations. Follow these simple steps.
-
Select an Account
- Go to “My Accounts”, “Cryptocurrency Accounts” tab.
- Locate the account and click the settings icon.
- Select “Top Up” from the menu.
-
Copy the Address
- A crypto wallet address will be displayed for the transfer.
- Copy the address or scan the QR code with a mobile wallet.
-
Send the Transfer
- Send the desired amount to the provided address.
- Important: Only Tether USDT (TRC20) is supported.
- Minimum funding amount is 5 USDT. Smaller amounts won’t be credited.
-
Await Crediting
- Funds will be credited after blockchain confirmation.
- This usually takes 1–10 minutes, depending on network load.
My Accounts
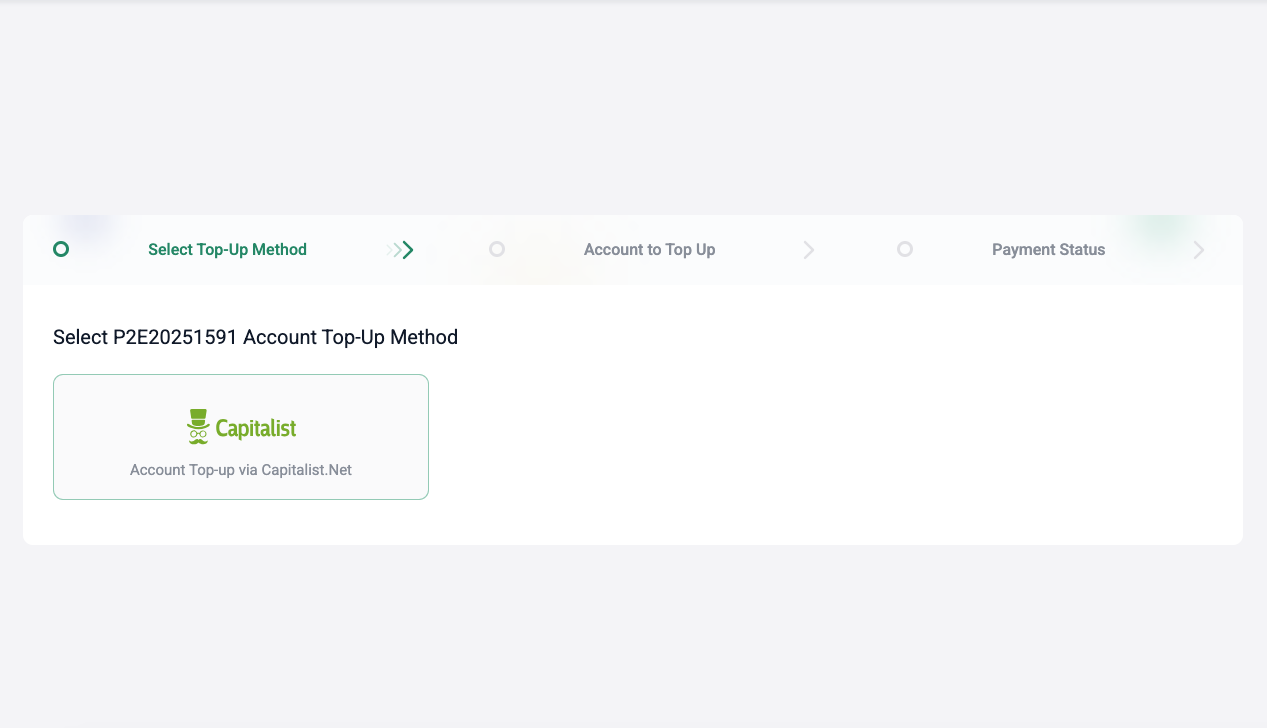
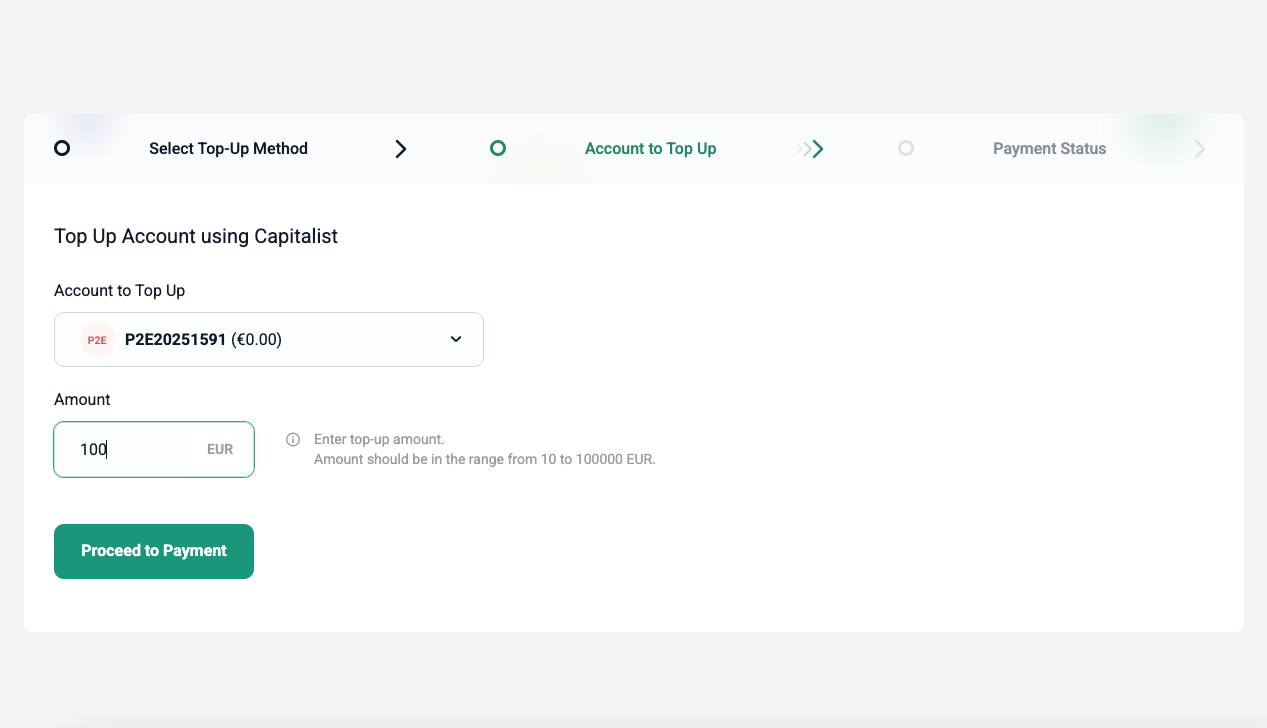
Funding a Main Account (USD, EUR)
Fund your USD or EUR accounts via Capitalist. It’s quick and takes just a few minutes.
-
Select an Account
- Go to “My Accounts”, “Main Accounts” tab.
- Locate the account and click the settings icon.
- Select “Top Up” from the menu.
-
Choose a Funding Method
- A page will list available funding options.
- Select Capitalist for a fast transfer from your Capitalist account.
-
Enter the Amount
- Confirm the correct account is selected.
- Input the amount to fund.
- Click “Proceed to Payment”.
-
Complete the Process
- You’ll be redirected to Capitalist to confirm the payment.
- Funds will be automatically credited to your Pay2.House account after payment.
My Accounts
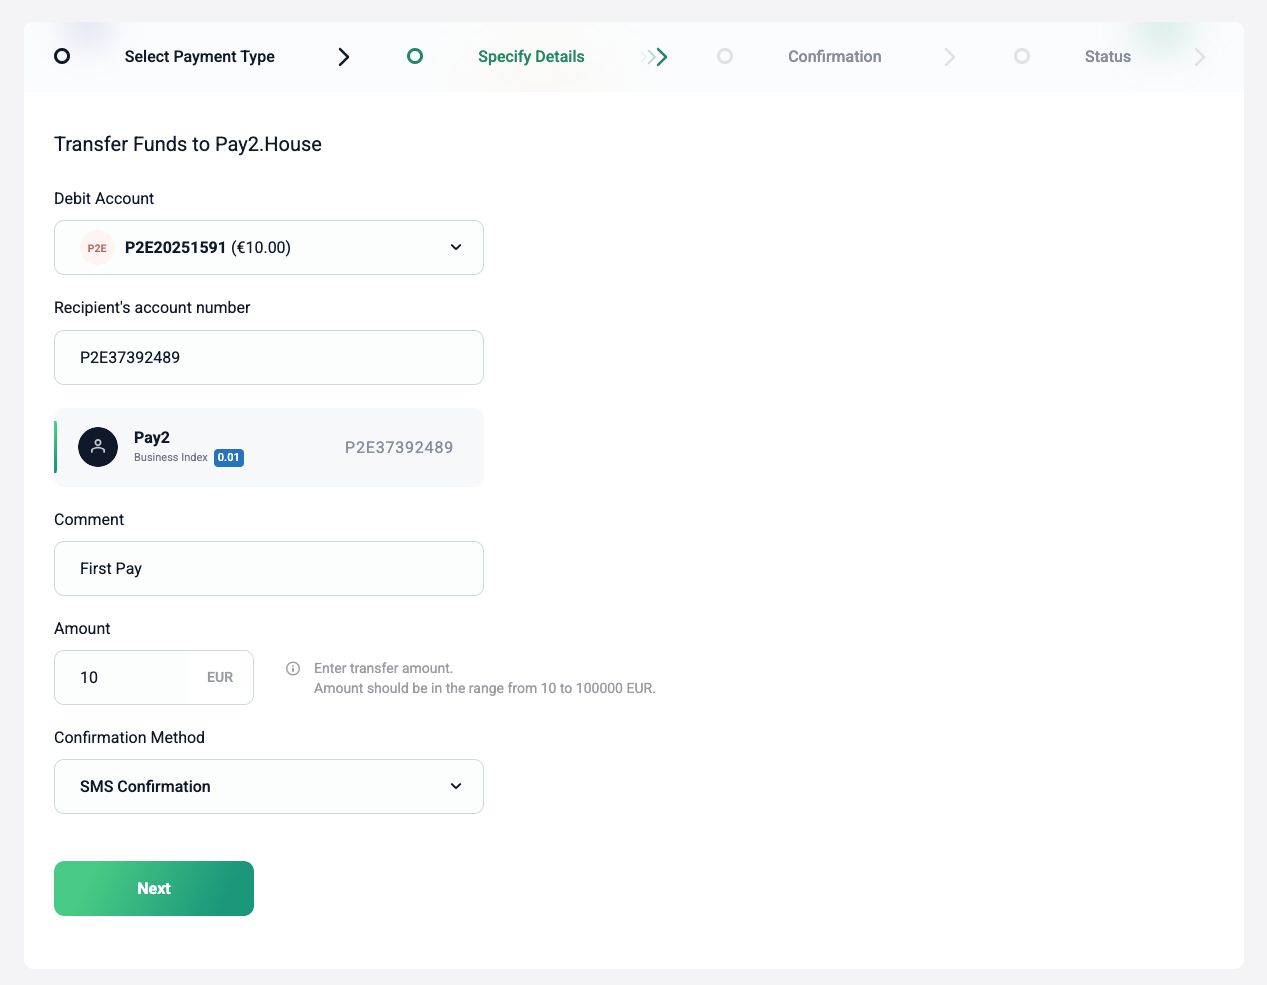
Internal Transfers Between Accounts (USDT, USD, EUR)
Transfer funds between your accounts or to another Pay2.House user. Transfers are fee-free and credited within 1 minute.
-
Select an Account
- Select “Main Accounts” for USD/EUR or “Cryptocurrency Accounts” for USDT.
- Locate the account and click the settings icon.
- Choose “Transfer” from the menu.
-
Provide Details
- Select the “Account to Debit” for withdrawing funds.
- Note: Transfers are only allowed between accounts of the same currency: USD (P2U), EUR (P2E), or USDT (P2T).
- Enter the recipient’s account number (starts with P2U, P2E, or P2T).
- Specify the transfer amount and add a comment.
- The system will display any applicable fees separately.
- Choose a verification method (e.g., Google 2FA).
-
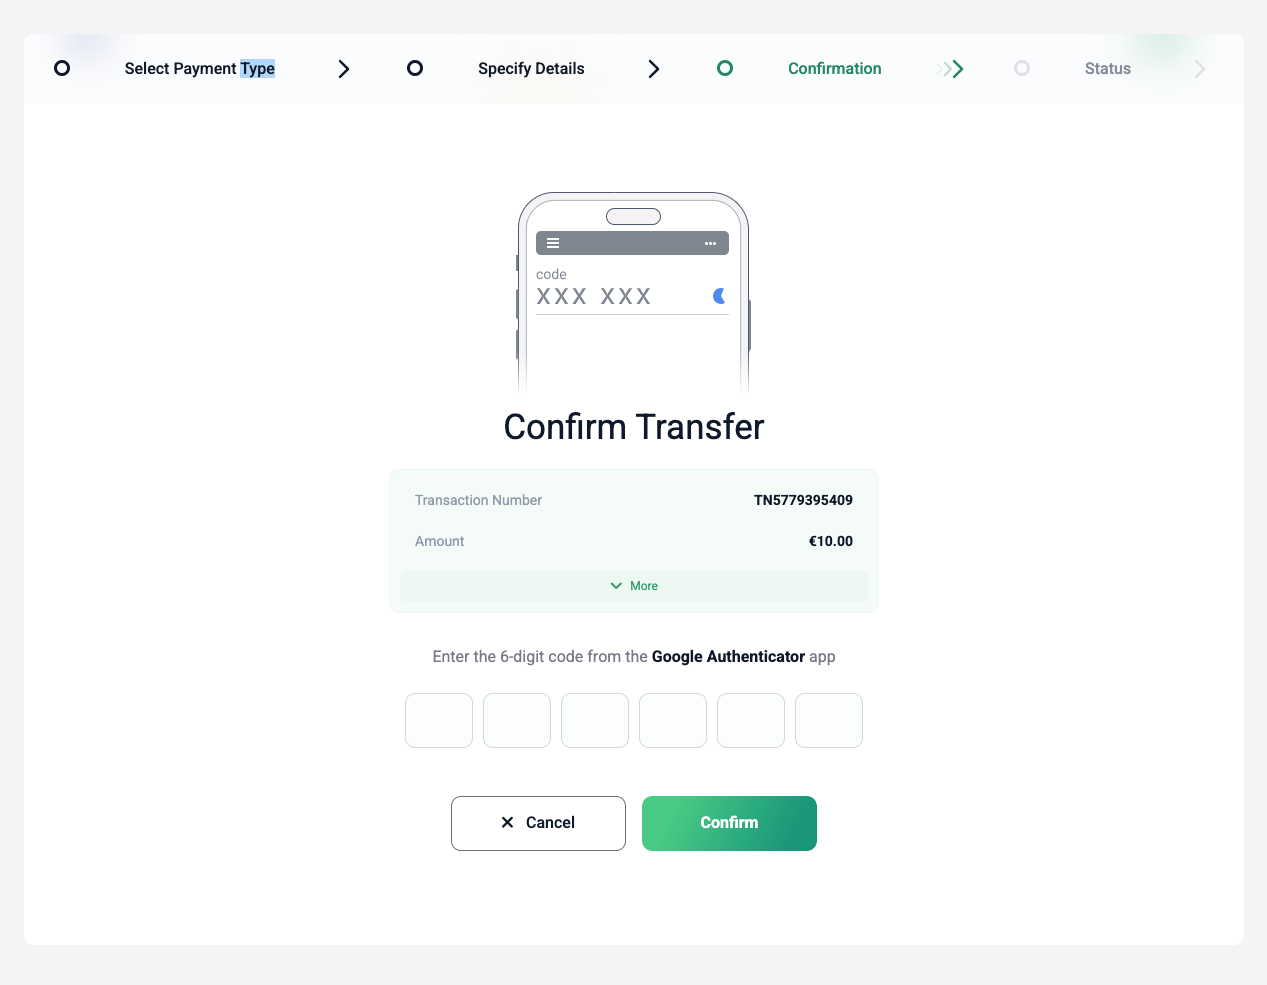
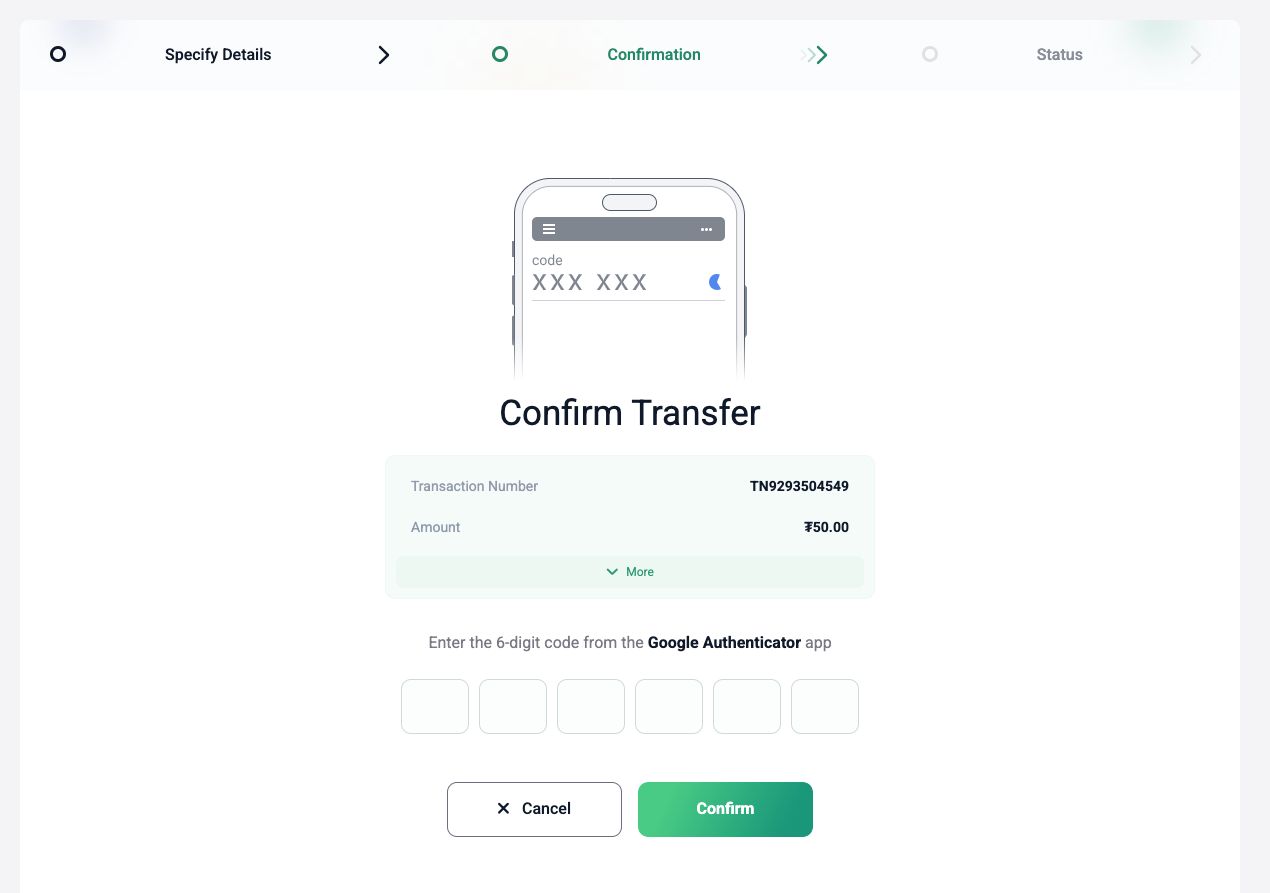
Confirm the Transfer
- Click “Next”.
- Enter the 6-digit code from Google Authenticator.
- Click “Confirm”.
-
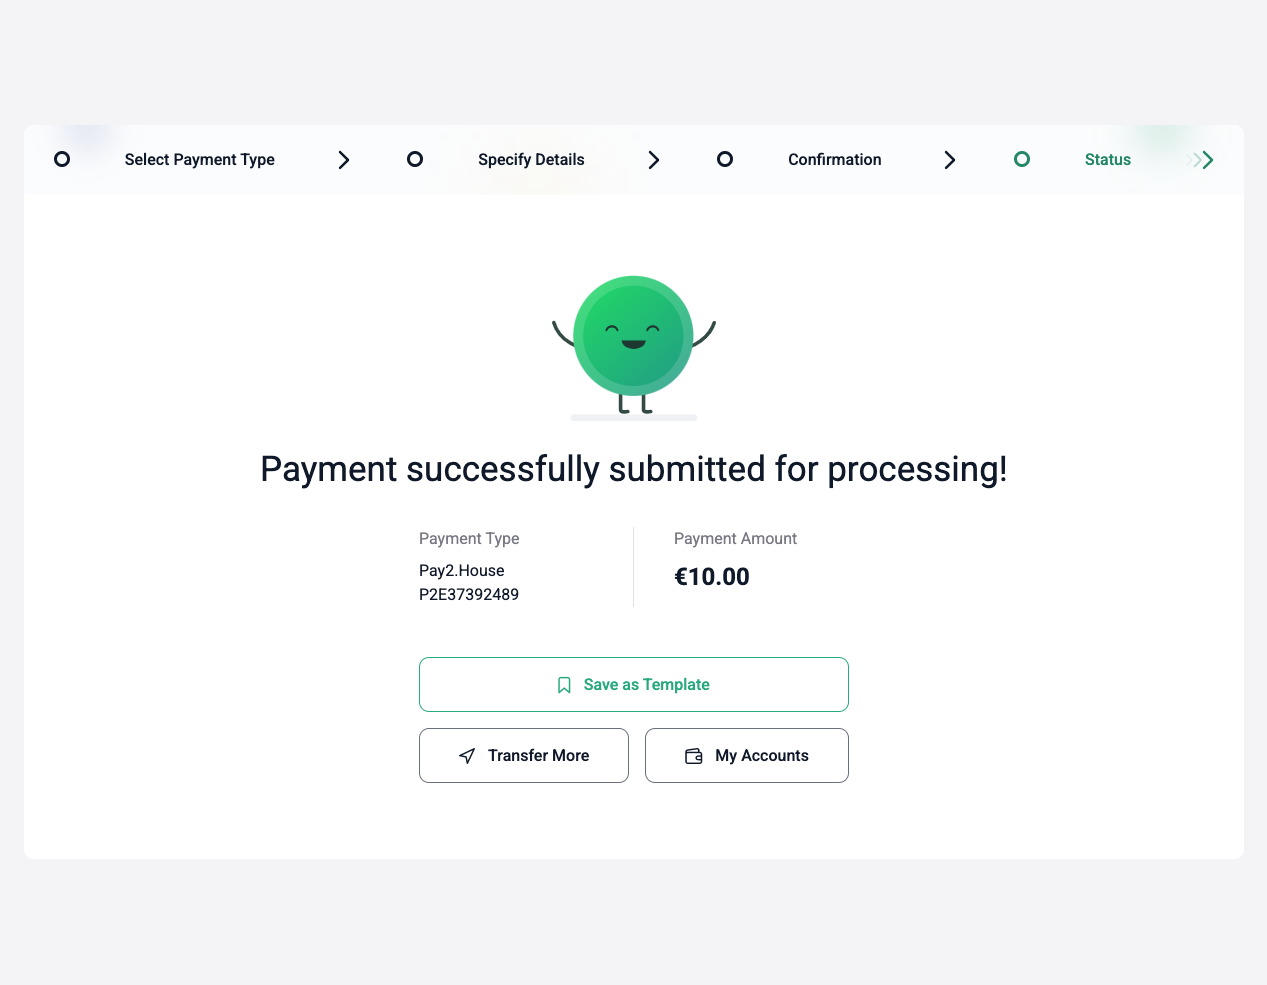
Complete the Process
- A message will confirm the payment was successfully sent.
- Funds will reach the recipient within 1 minute.
- Save the transfer as a template for future use.
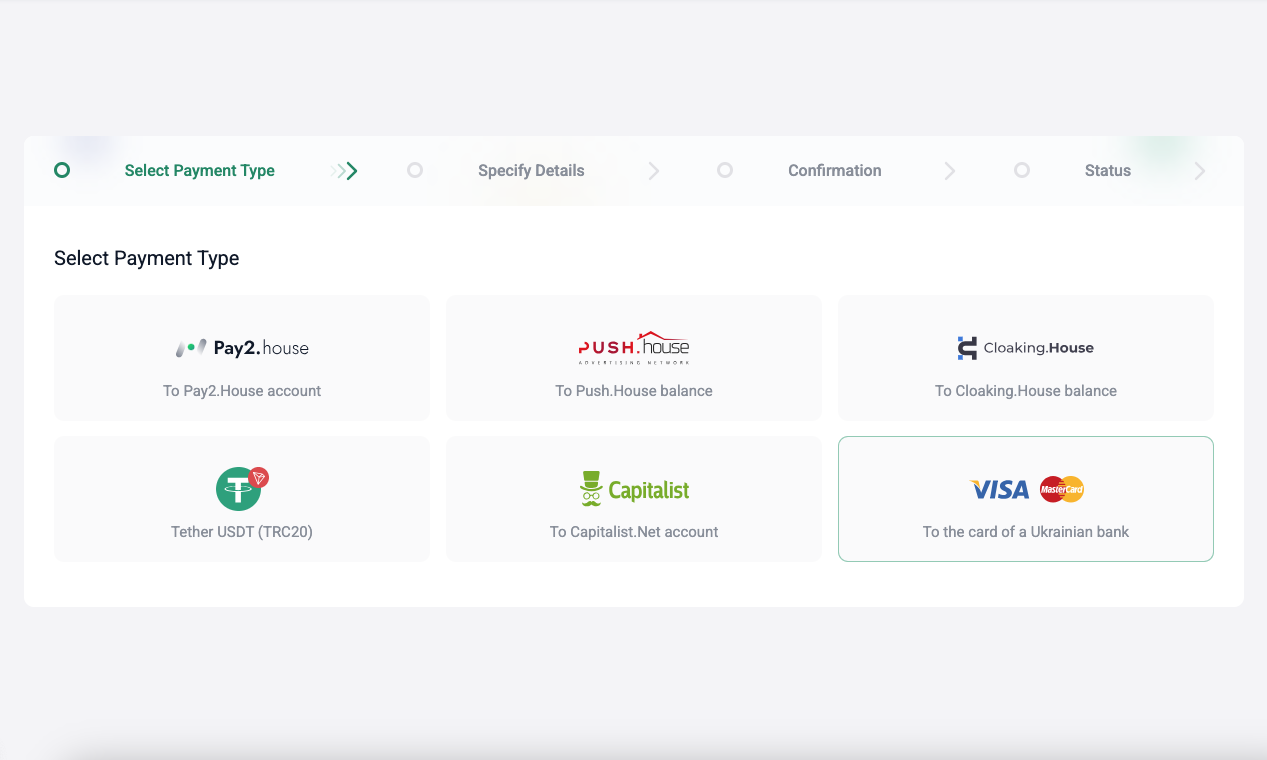
Transfers
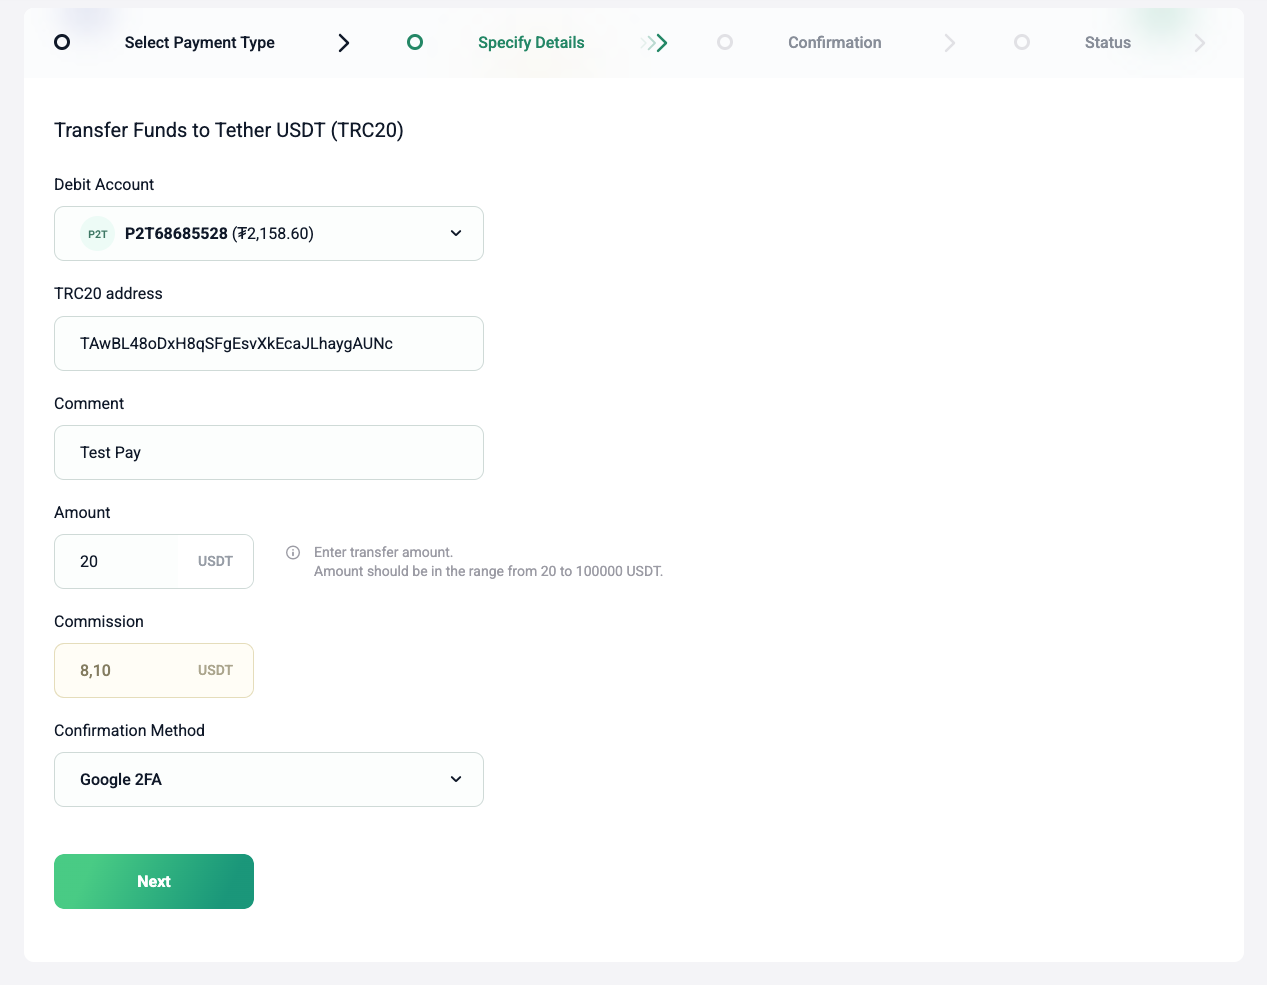
USDT Transfer via TRC20 Network
Withdraw funds from your Pay2.House crypto account to an external TRC20 wallet on the Tether USDT network. This is ideal for using crypto outside the platform. Note: A fee applies.
-
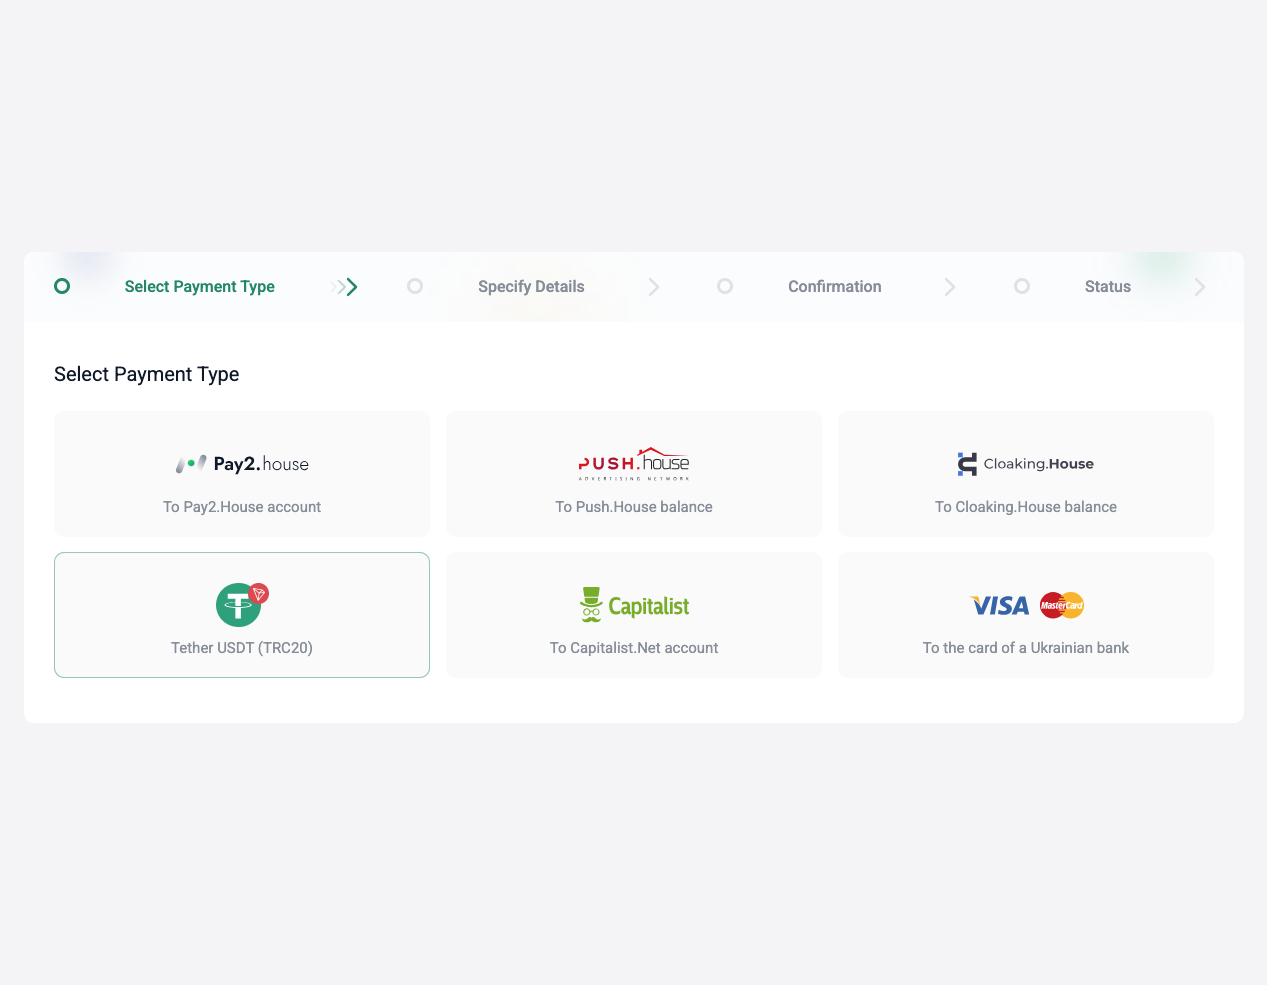
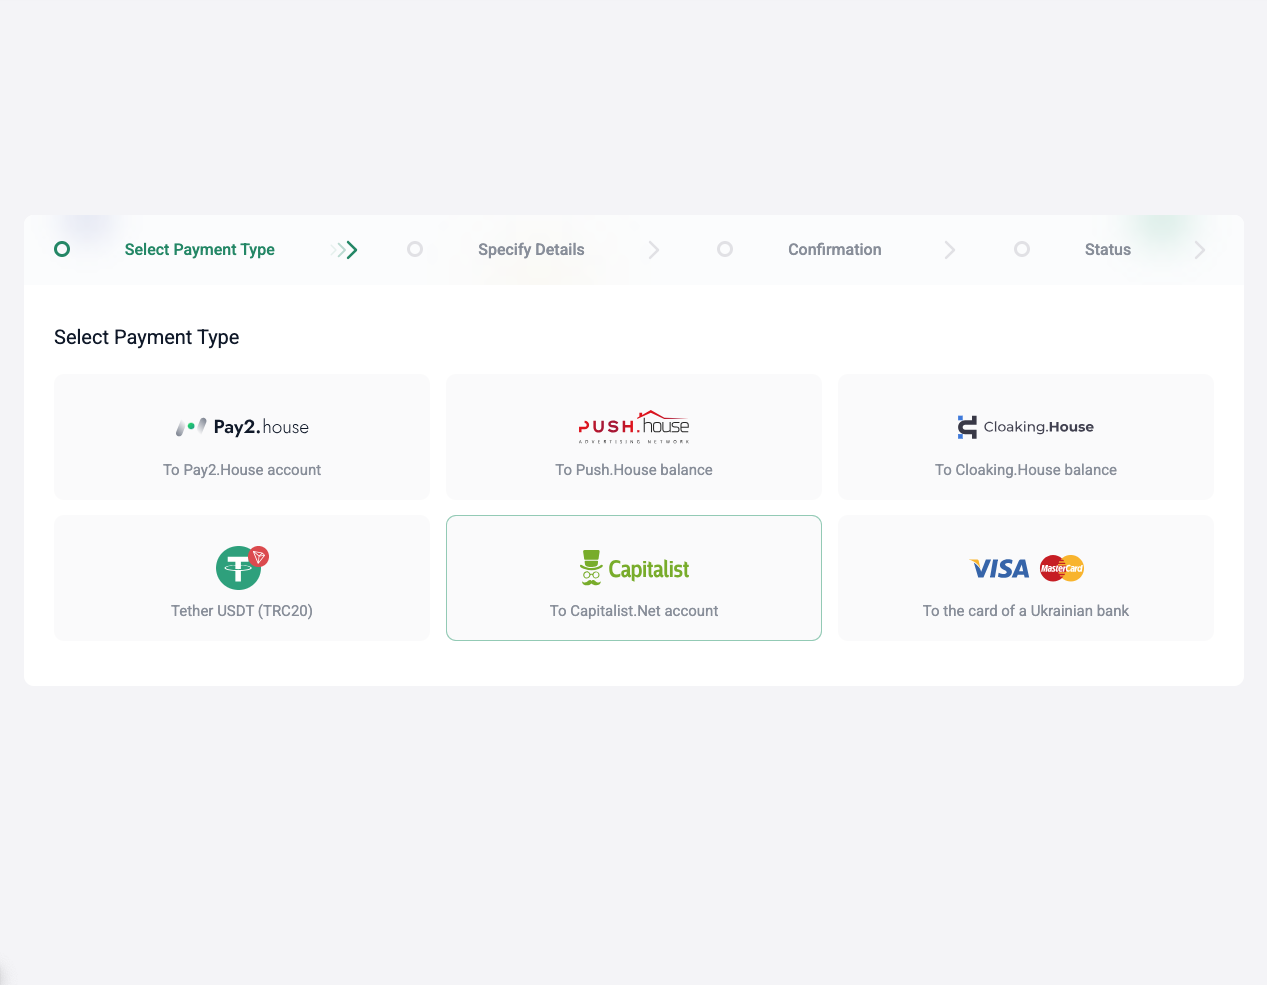
Select Payment Type
- Navigate to “Transfers” in the left menu.
- Choose “Tether USDT (TRC20)”.
-
Provide Details
- Select your USDT account (starts with P2T) in the “Account to Debit” field.
- Enter the recipient’s TRC20 address (starts with T).
- Specify the transfer amount and add a comment.
- The system will display any applicable fees separately.
- Choose a verification method (e.g., Google 2FA).
-
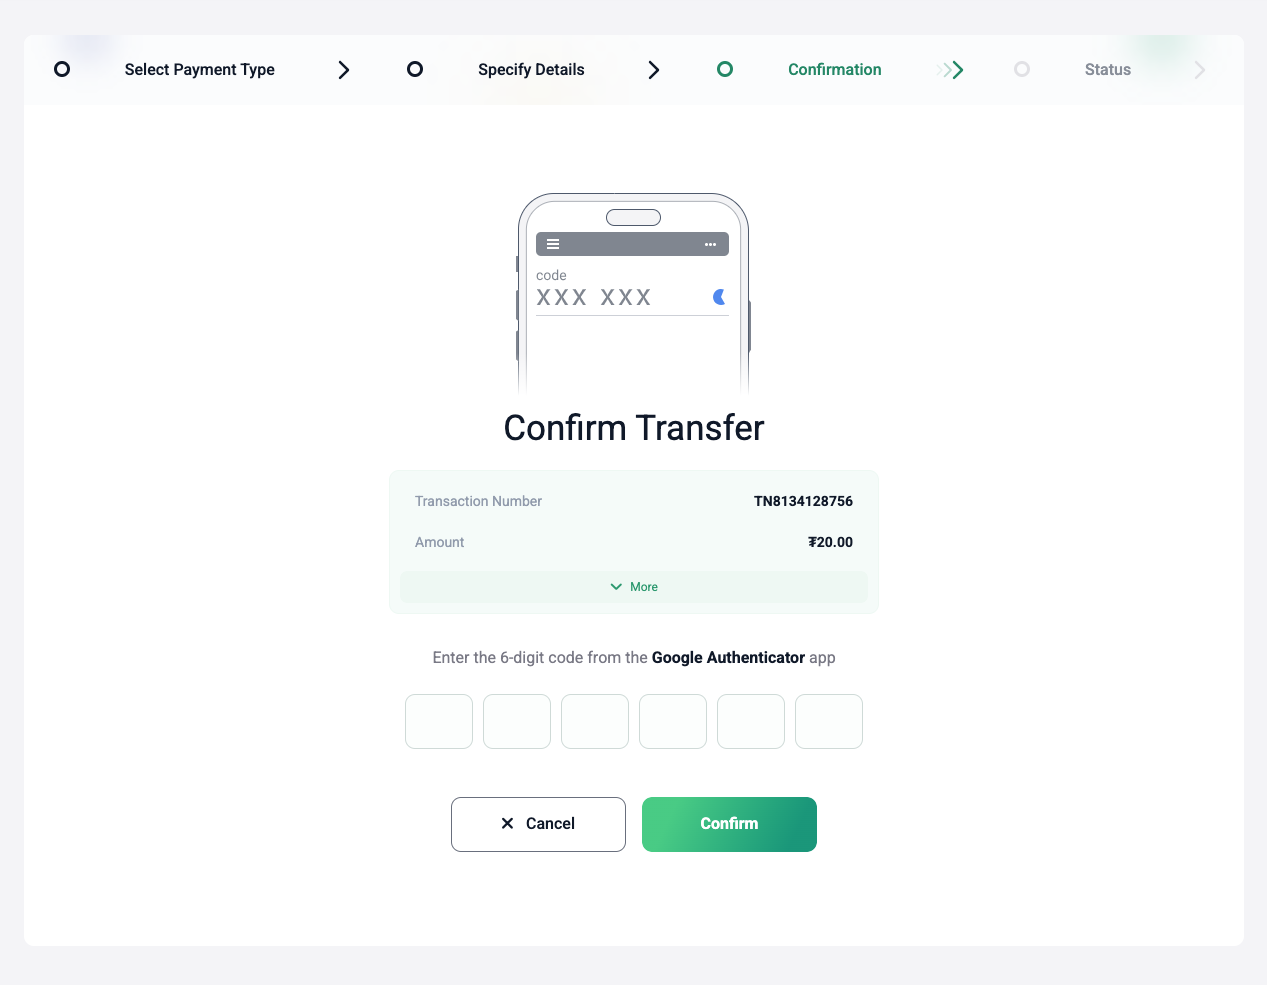
Confirm the Transfer
- Click “Next”.
- Enter the 6-digit code from Google Authenticator.
- Click “Confirm”.
-
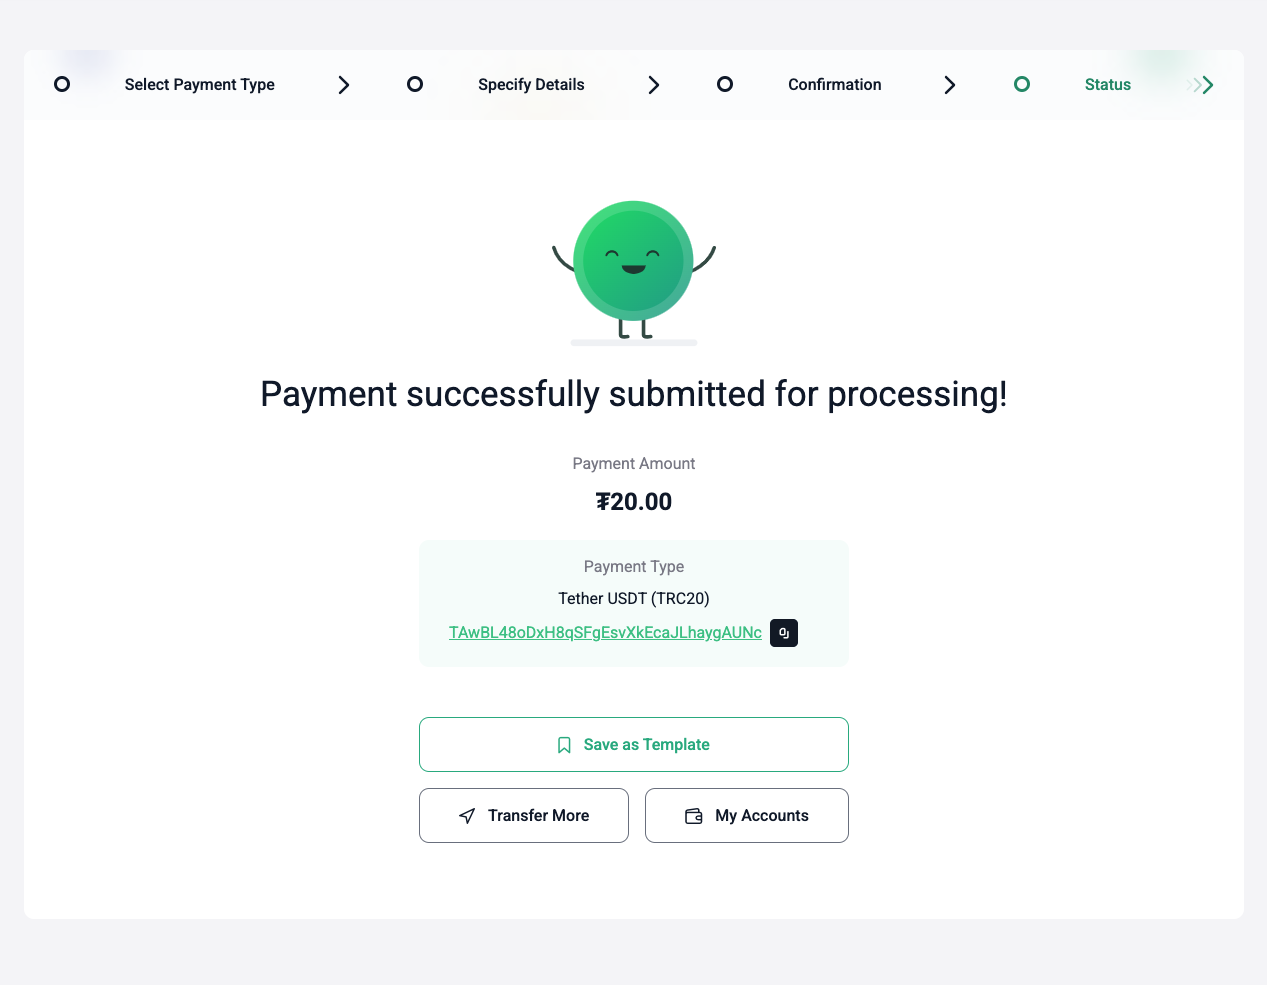
Complete the Process
- A message will indicate the payment is being processed.
- Funds will be transferred after finance team review, typically within 2 hours during business hours.
- Save the transfer as a template for reuse.
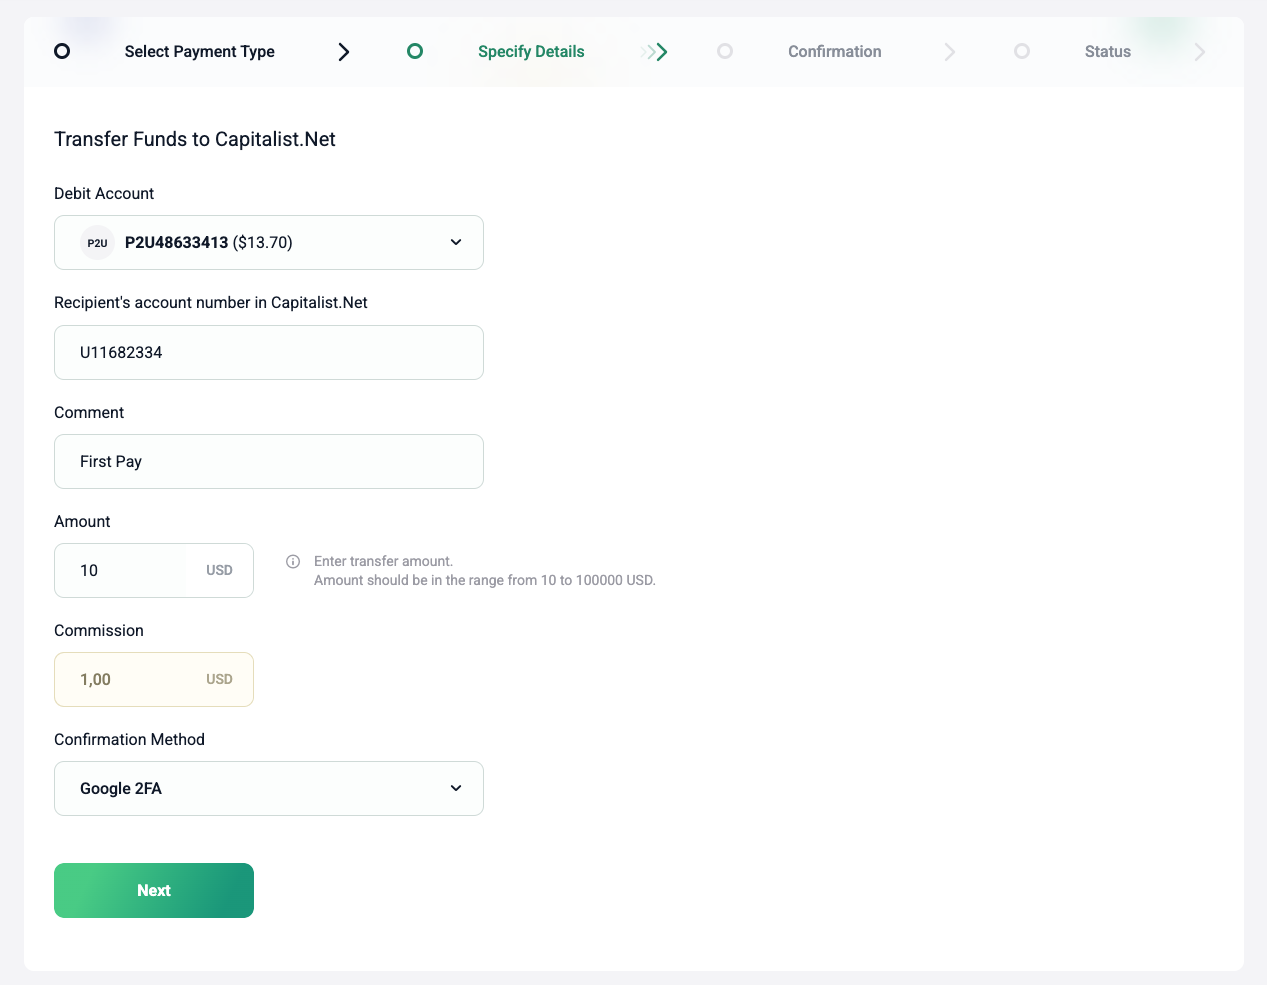
Transfers
Transfer to Capitalist (USD, EUR)
Send funds to the Capitalist payment system for withdrawals or transfers to other Capitalist users. The process is simple and takes a few minutes.
-
Select Payment Type
- Navigate to “Transfers” in the left menu.
- Select “To a Capitalist.Net Account”.
-
Provide Details
- Choose the account to debit: P2U for USD, P2E for EUR.
- Enter the recipient’s Capitalist account number (e.g., U11682334).
- Specify the transfer amount and add a comment.
- The system will display any applicable fees separately.
- Choose a verification method (e.g., Google 2FA).
-
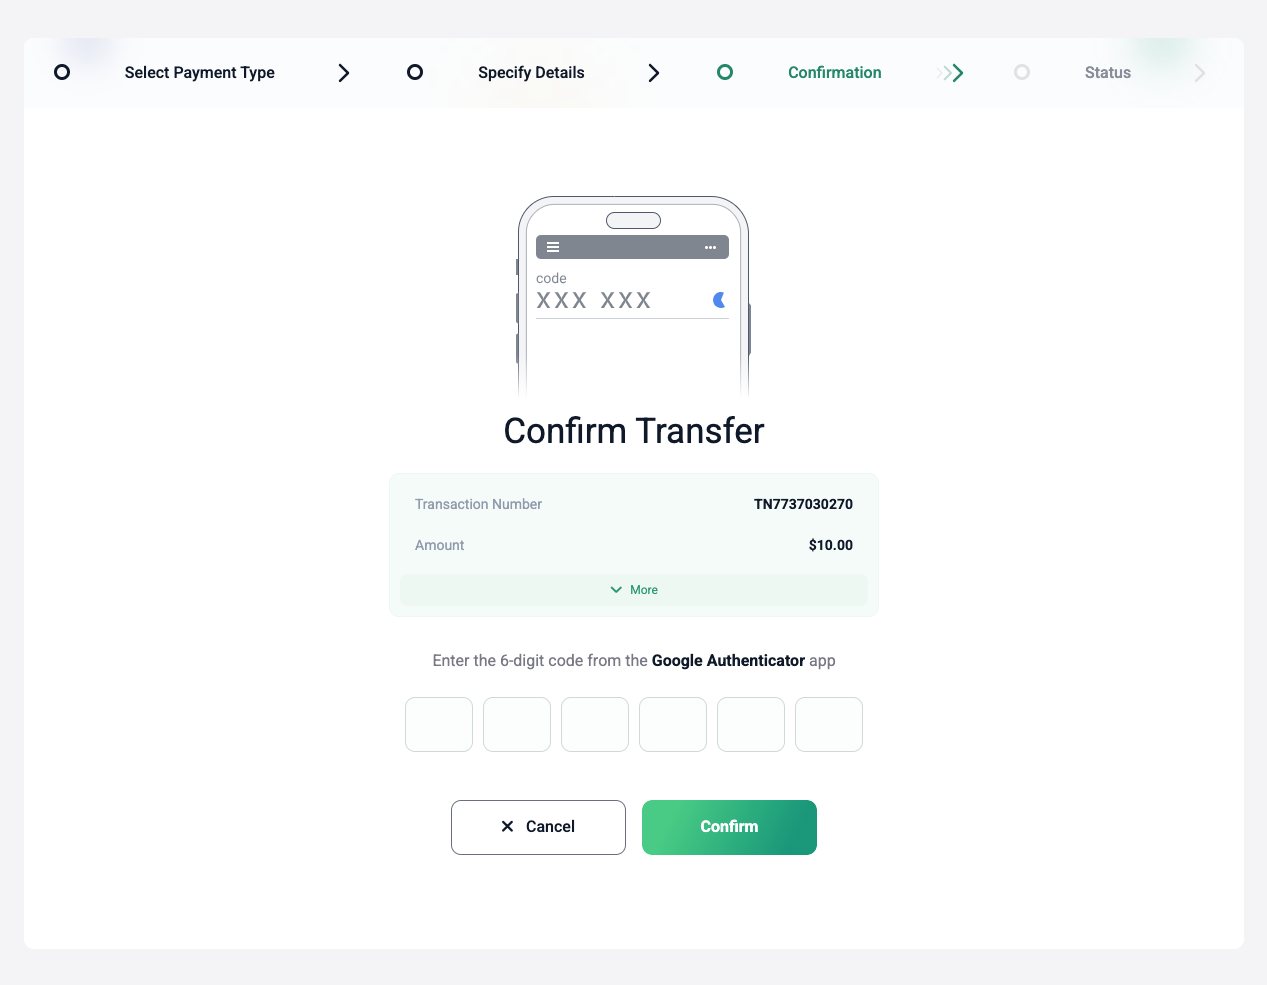
Confirm the Transfer
- Click “Next”.
- Enter the 6-digit code from Google Authenticator.
- Click “Confirm”.
-
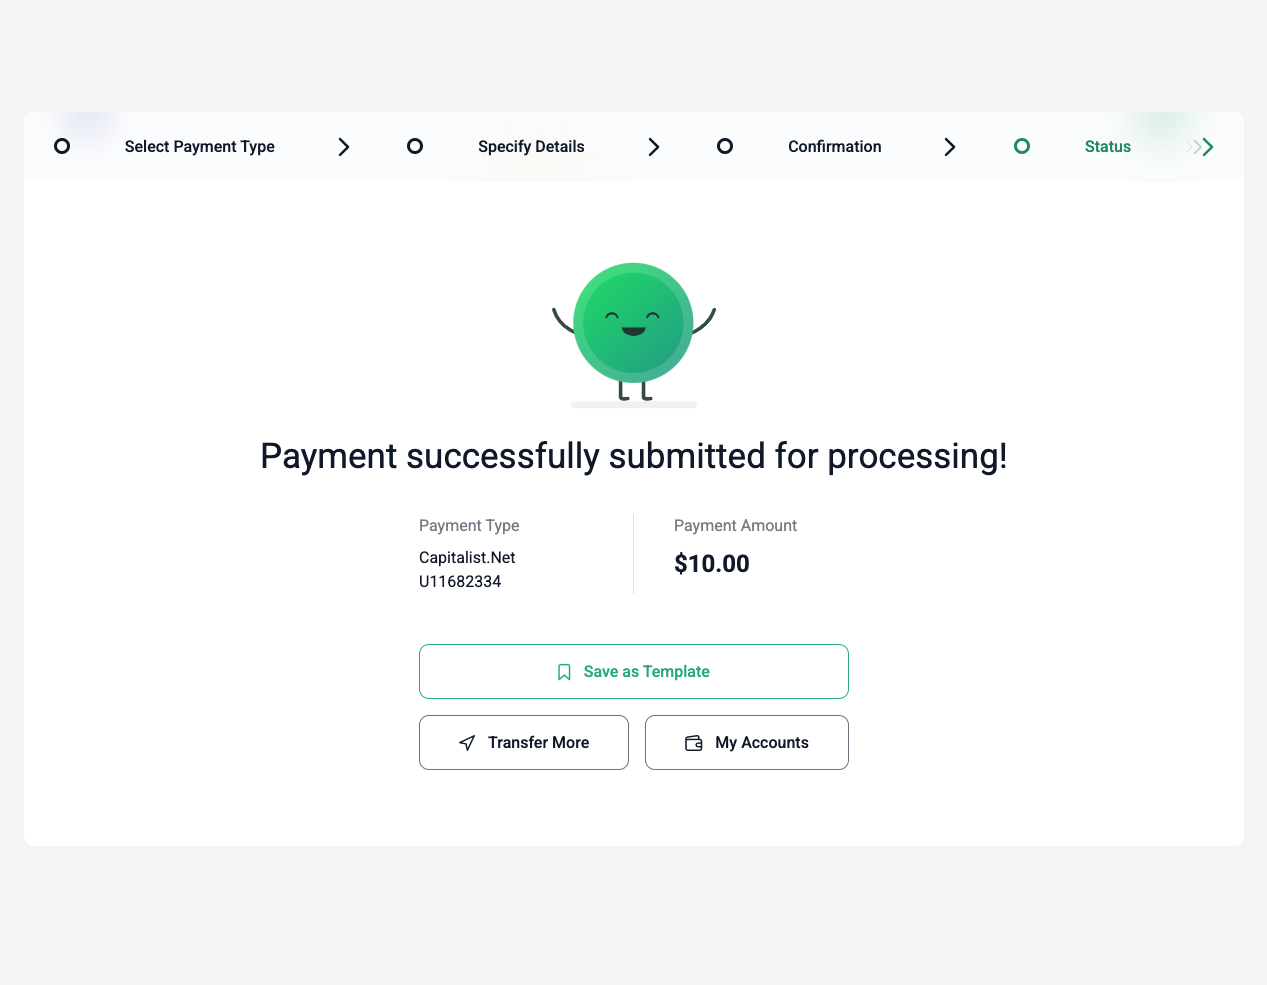
Complete the Process
- A message will confirm the payment is being processed.
- Funds will be transferred after finance team review, typically within 2 hours during business hours.
- Save the transfer as a template for reuse.
Transfers
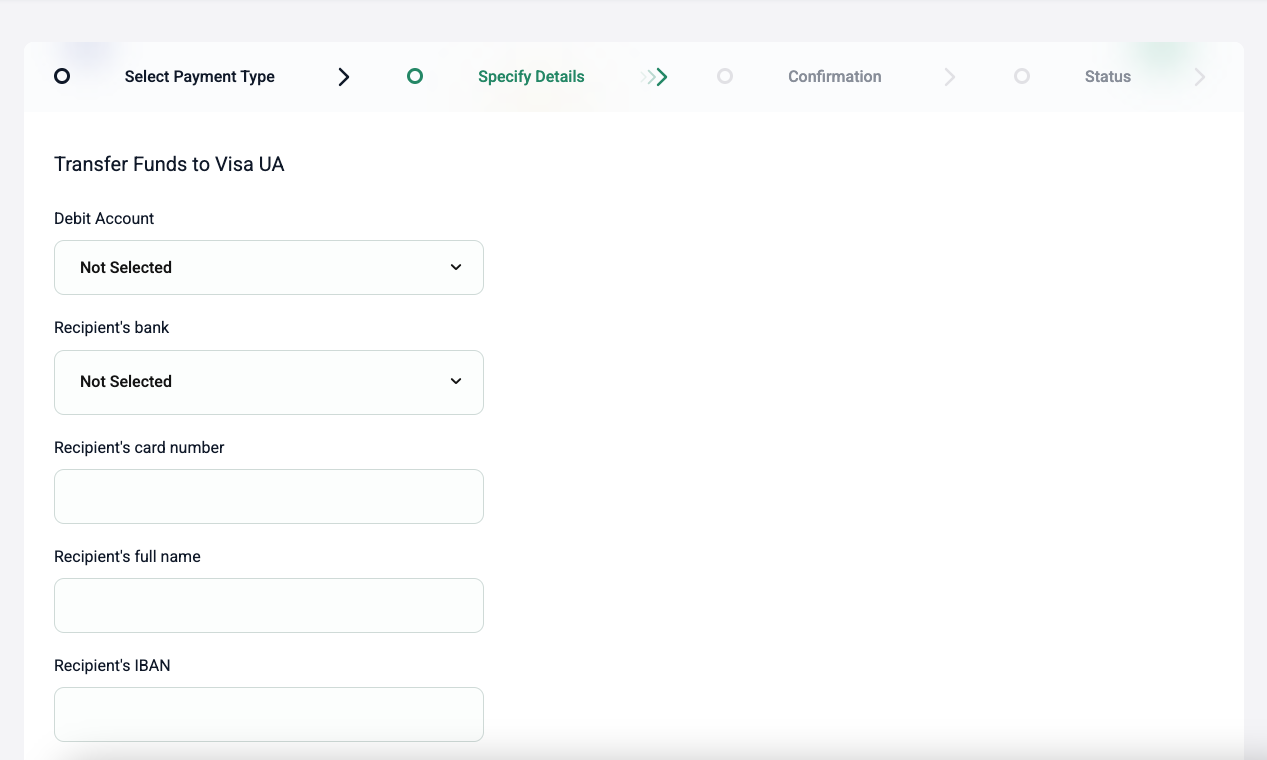
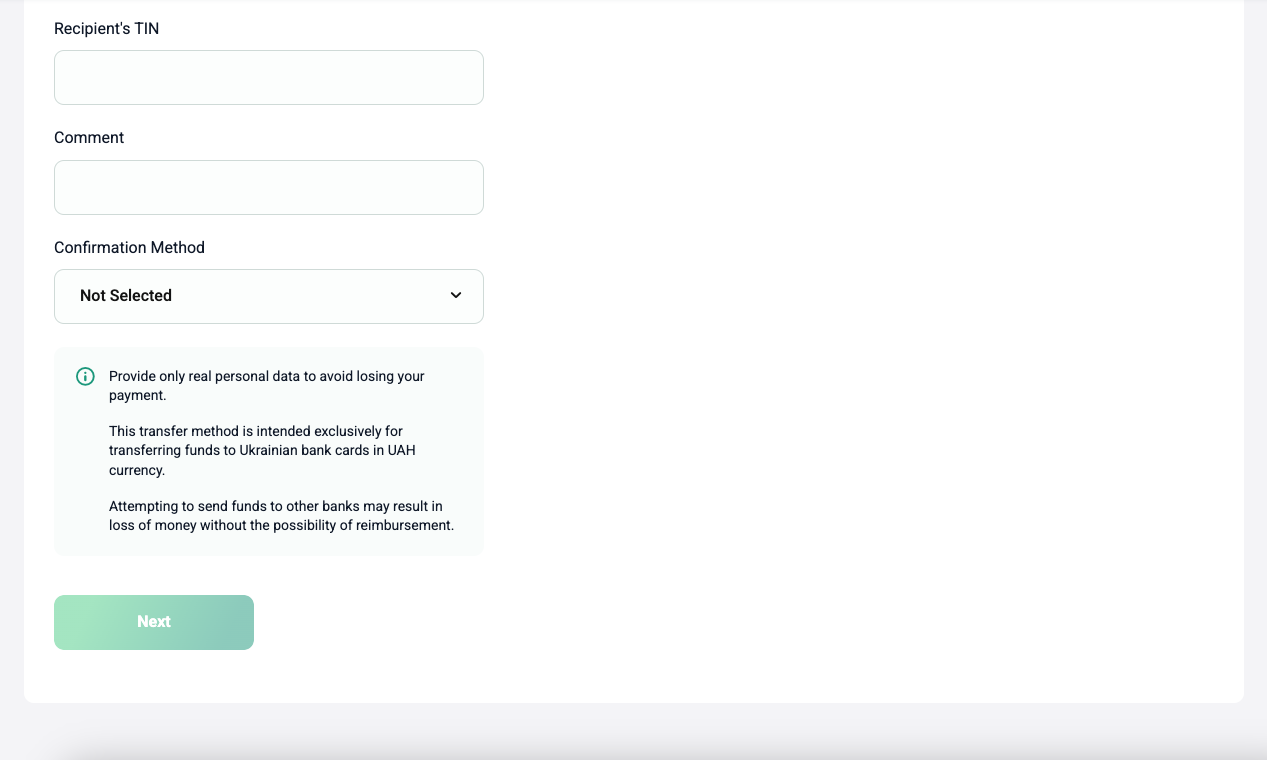
Transfer to a Ukrainian Bank Card (UAH)
Send funds to any Ukrainian bank card. Funds from USD, EUR, or USDT accounts are automatically converted to UAH for the recipient.
-
Select Payment Type
- Navigate to “Transfers” in the left menu.
- Select “To a Ukrainian Bank Card”.
-
Provide Details
Use only accurate details — errors may result in irreversible loss of funds.
- Choose your account: P2U (USD), P2E (EUR), or P2T (USDT).
- Recipient’s Bank — select from the list (e.g., PrivatBank).
- Card Number — 16 digits, no spaces.
- Recipient’s Full Name — as registered with the bank.
- IBAN — international bank account number.
- TIN — individual tax number (required for identification).
- Specify the transfer amount and add a comment.
- The system calculates fees and converts the amount to UAH at the current rate.
- Choose a verification method (e.g., Google 2FA).
-
Confirm the Transfer
- Click “Next”.
- Enter the 6-digit code from Google Authenticator.
- Click “Confirm”.
-
Complete the Process
- A message will confirm the payment is being processed.
- Funds will be transferred after finance team review, typically within 2 hours during business hours.
- Save the transfer as a template for reuse.
Virtual Cards
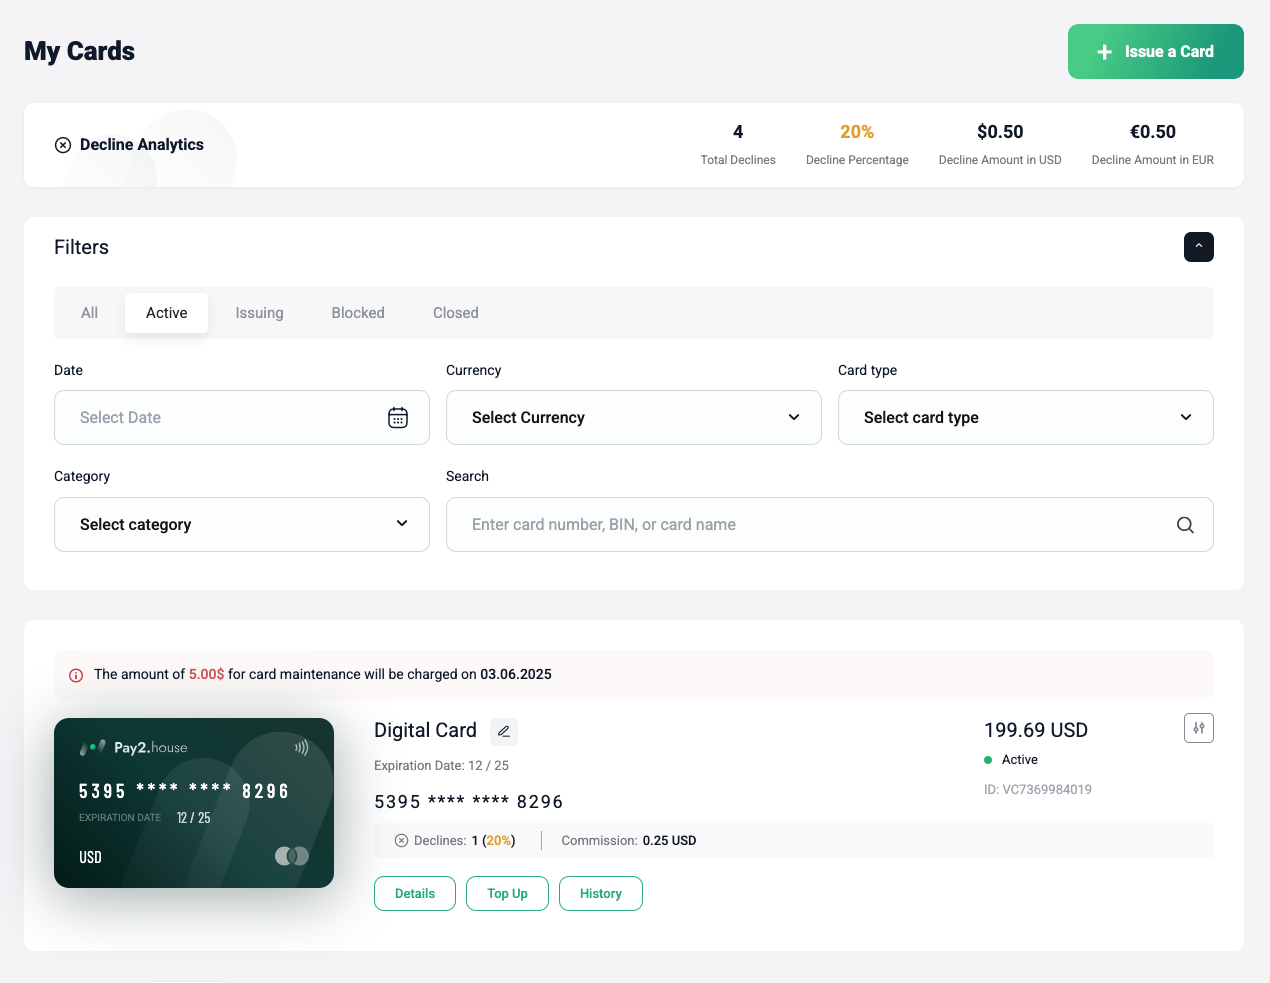
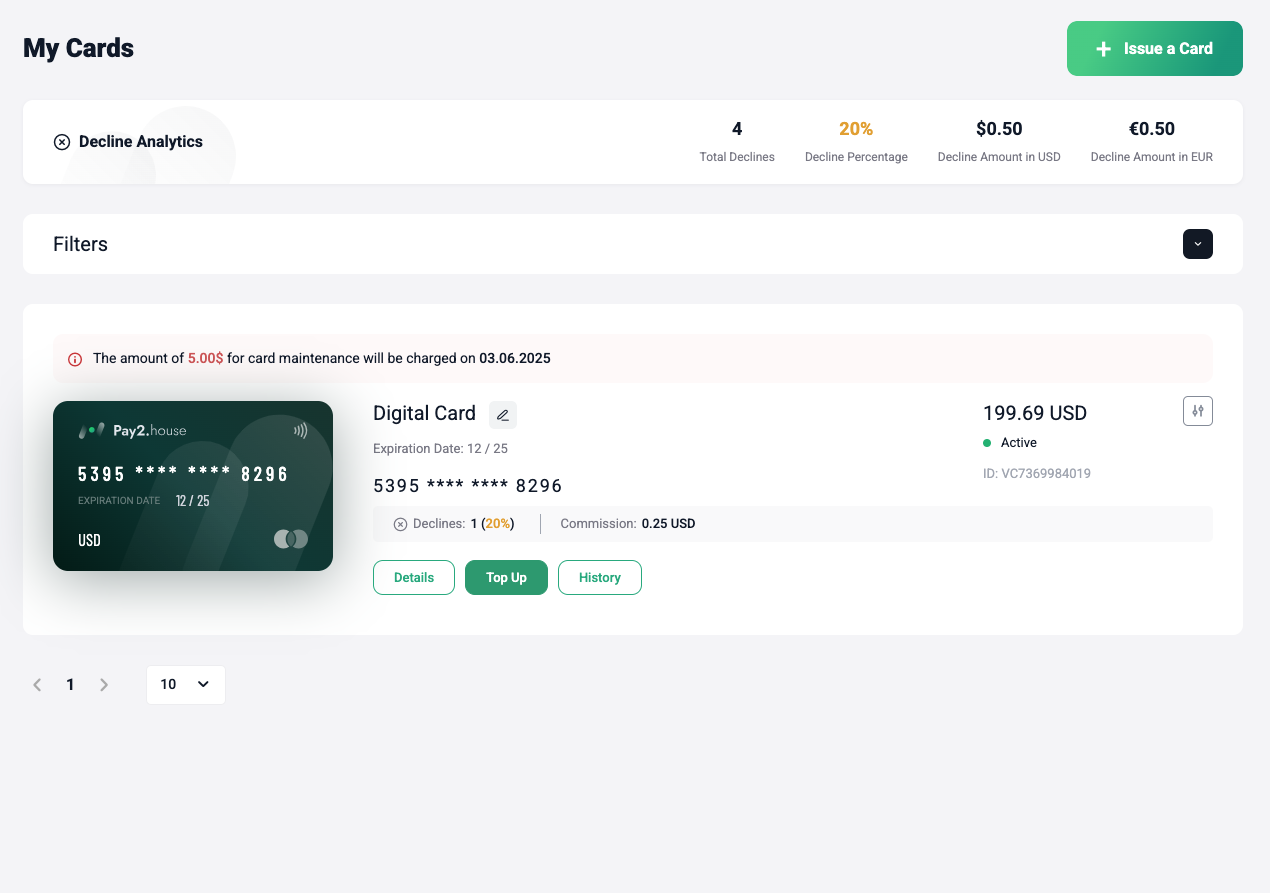
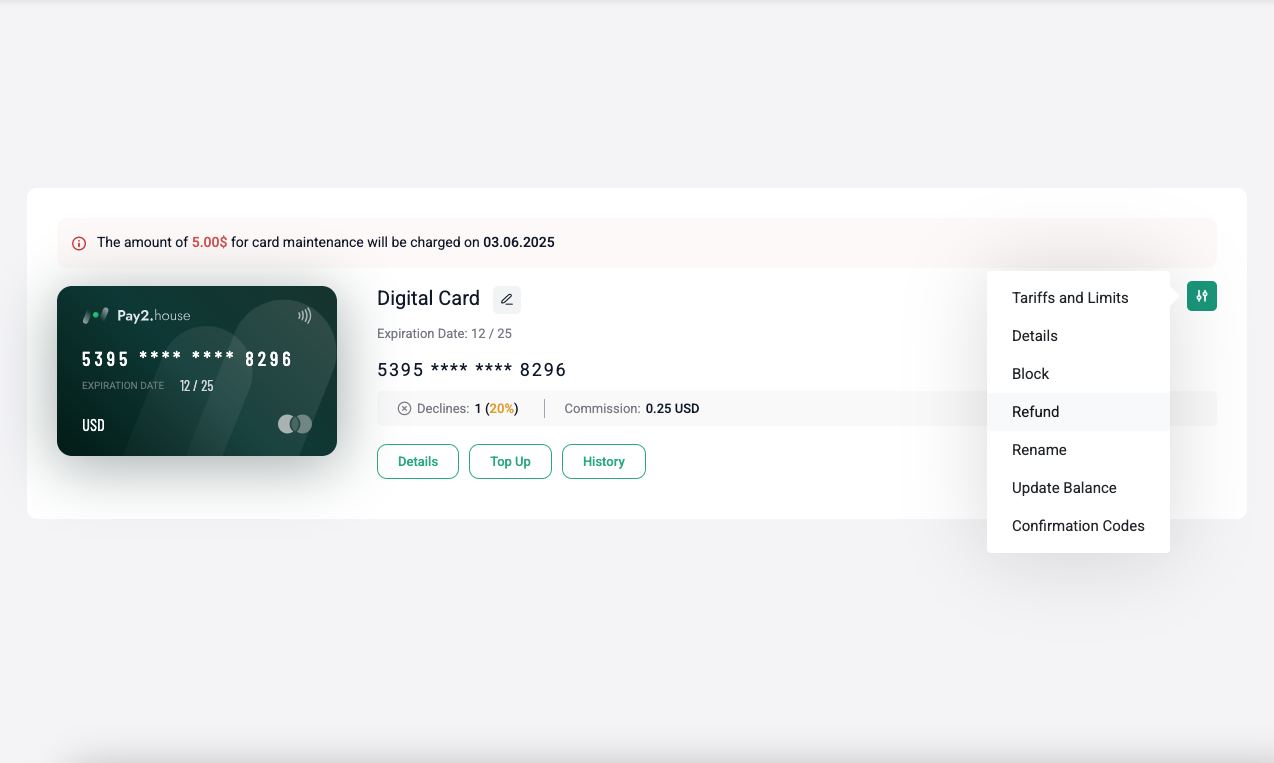
List of My Cards
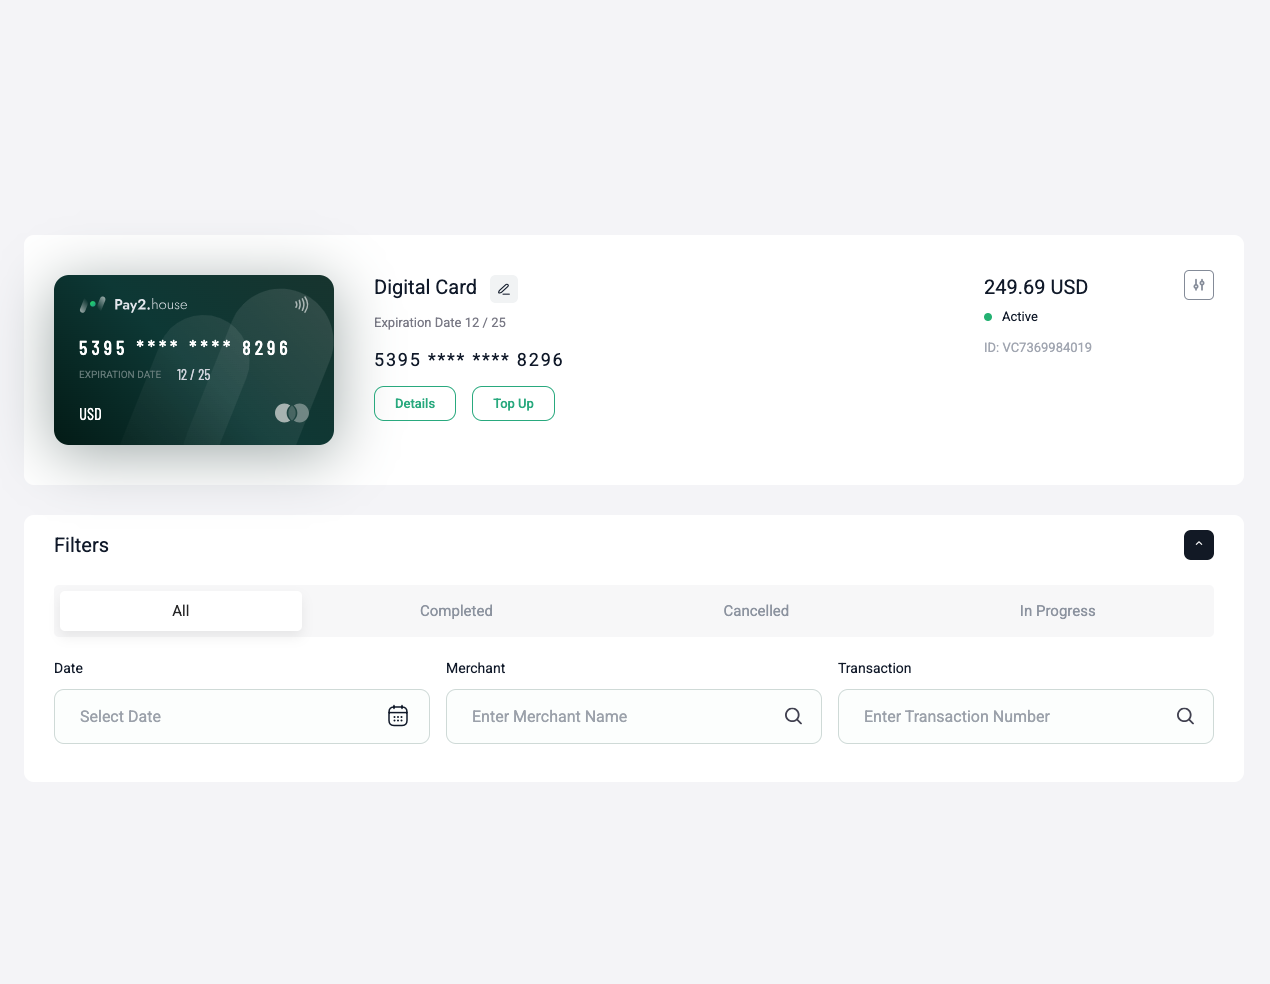
View all your virtual cards, including balance, currency, status, expiration, and transaction history.
-
View Cards
- Each card shows its balance, currency, and expiration date.
- The card ID and status (e.g., active, blocked) are also displayed.
-
Filters and Search
- Filter cards by date, currency, type, or status.
- Search by card number, BIN, or name.
-
Declined Transaction Insights
- View statistics on declined transactions, including count and percentage.
- See amounts of declined transactions in USD and EUR.
-
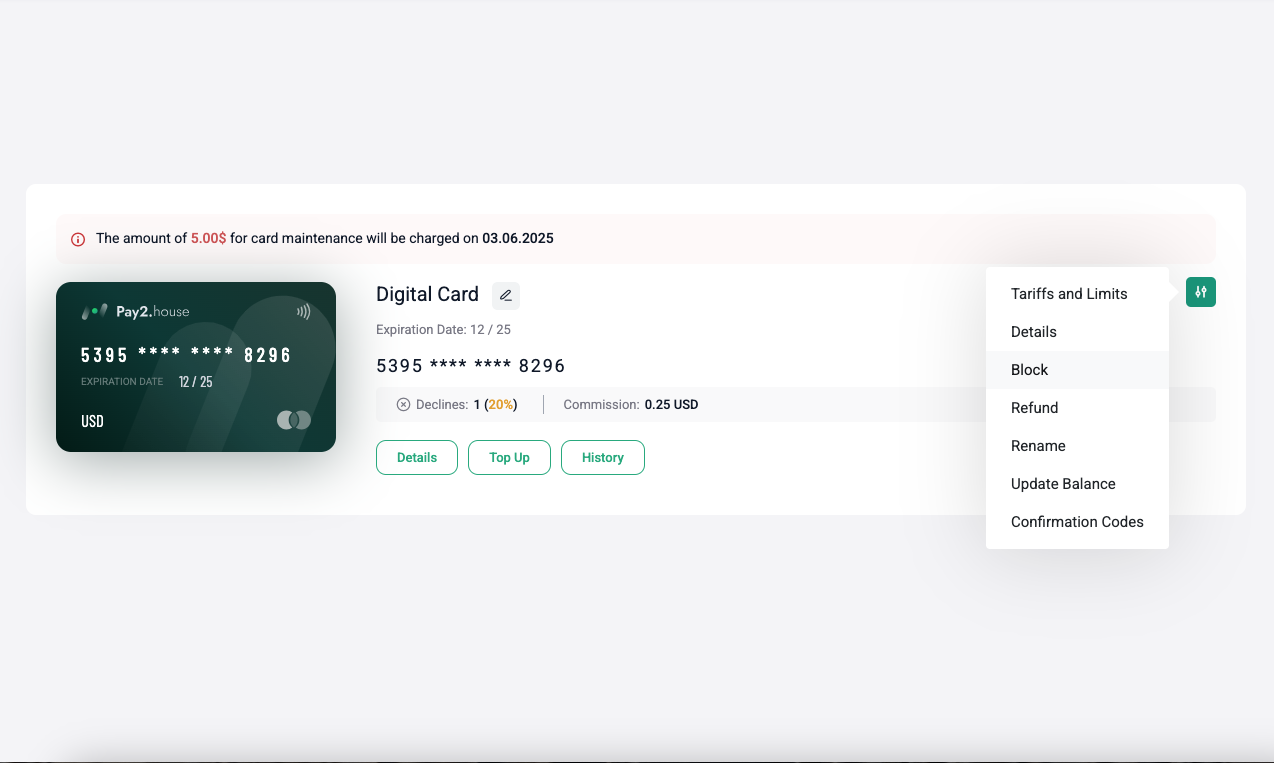
Card Actions
Each card offers:
- Details — view card information.
- Fund — add funds to the card.
- History — see all card transactions.
-
Status and Fees
- Active cards show the next maintenance fee date and amount.
- Inactive cards display the reason for blocking (e.g., expired or manually blocked).
Virtual Cards
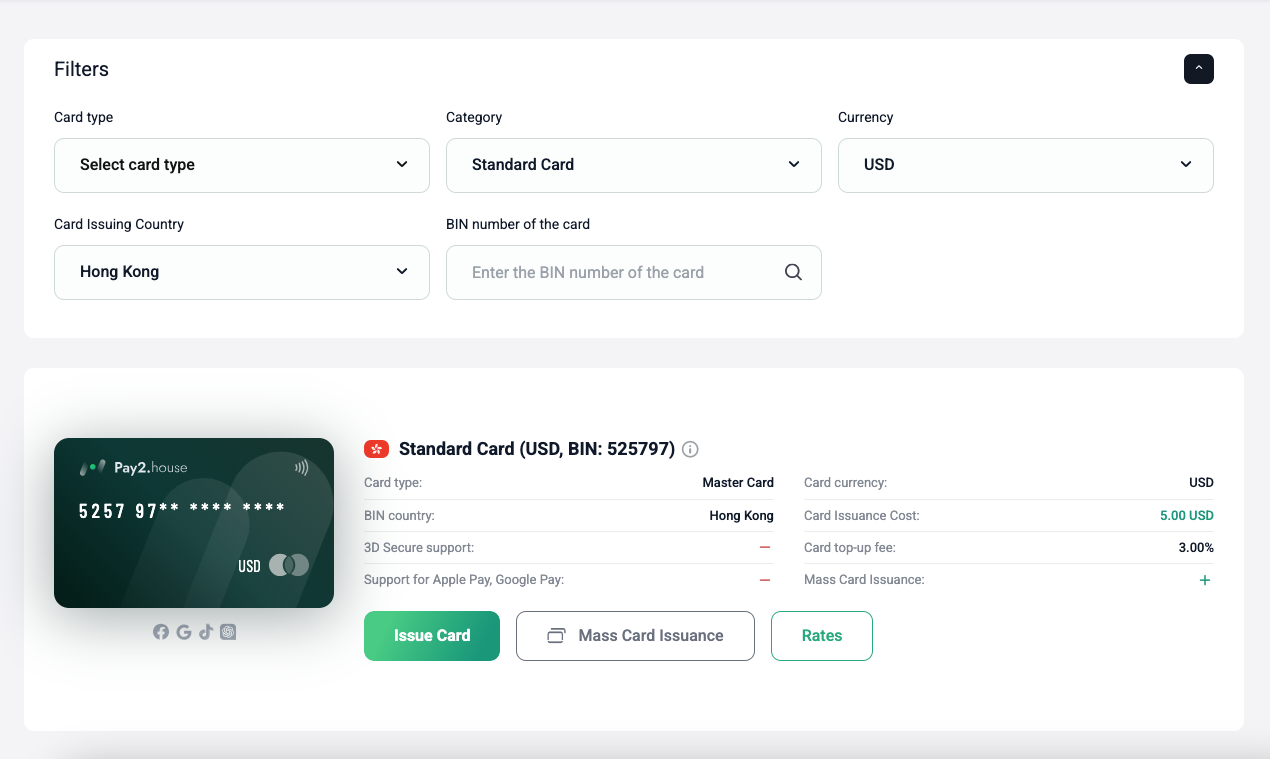
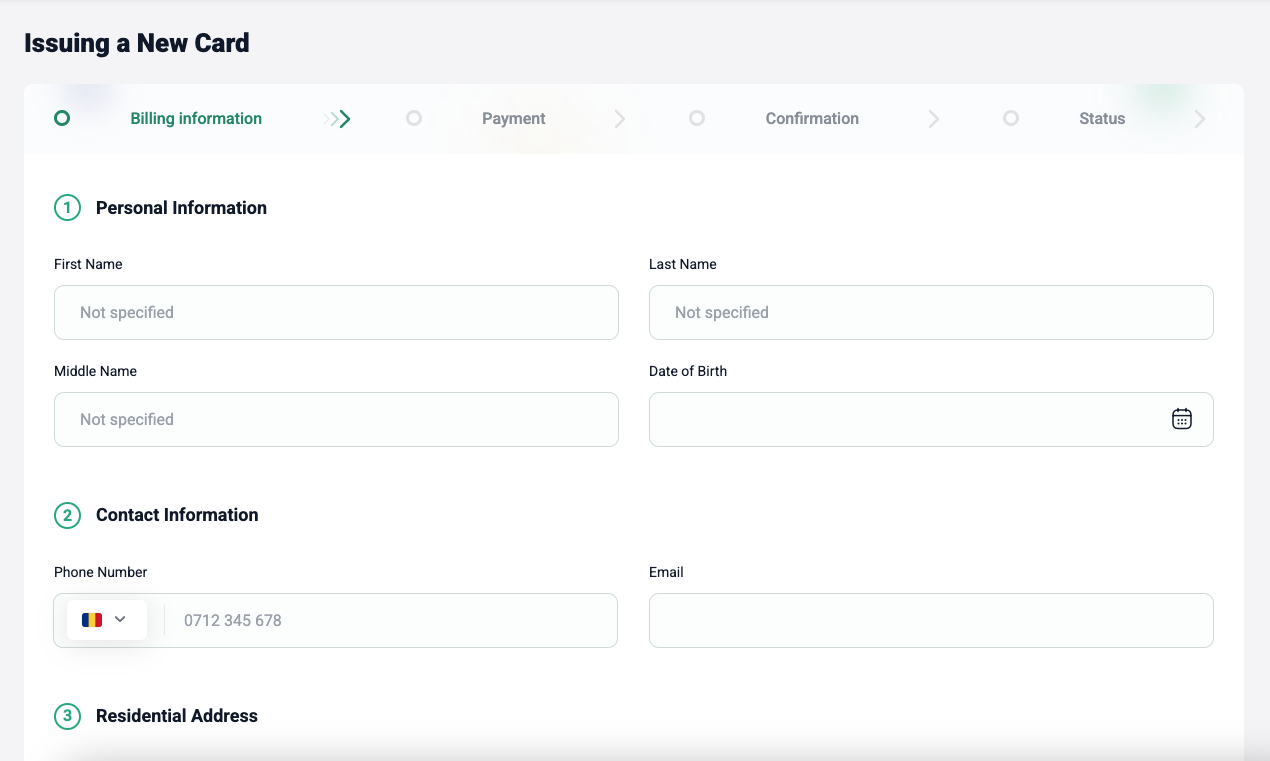
Issuing a New Card
Issue a virtual card in USD or EUR for online payments or advertising platforms. It takes just a few minutes.
-
Choose Card Parameters
- Go to “My Cards” and click “Issue Card”.
- Click “Filters” to select card features for your needs.
- Card Category:
- Standard — ideal for advertising platforms (Google Ads, Facebook, TikTok, etc.).
- Personal — add to Apple Pay/Google Pay for terminal payments.
- Currency — USD or EUR.
- Payment System — Visa or MasterCard.
- Issuing Country — the country of the issuing bank.
- After selecting parameters, click “Issue Card” to continue.
-
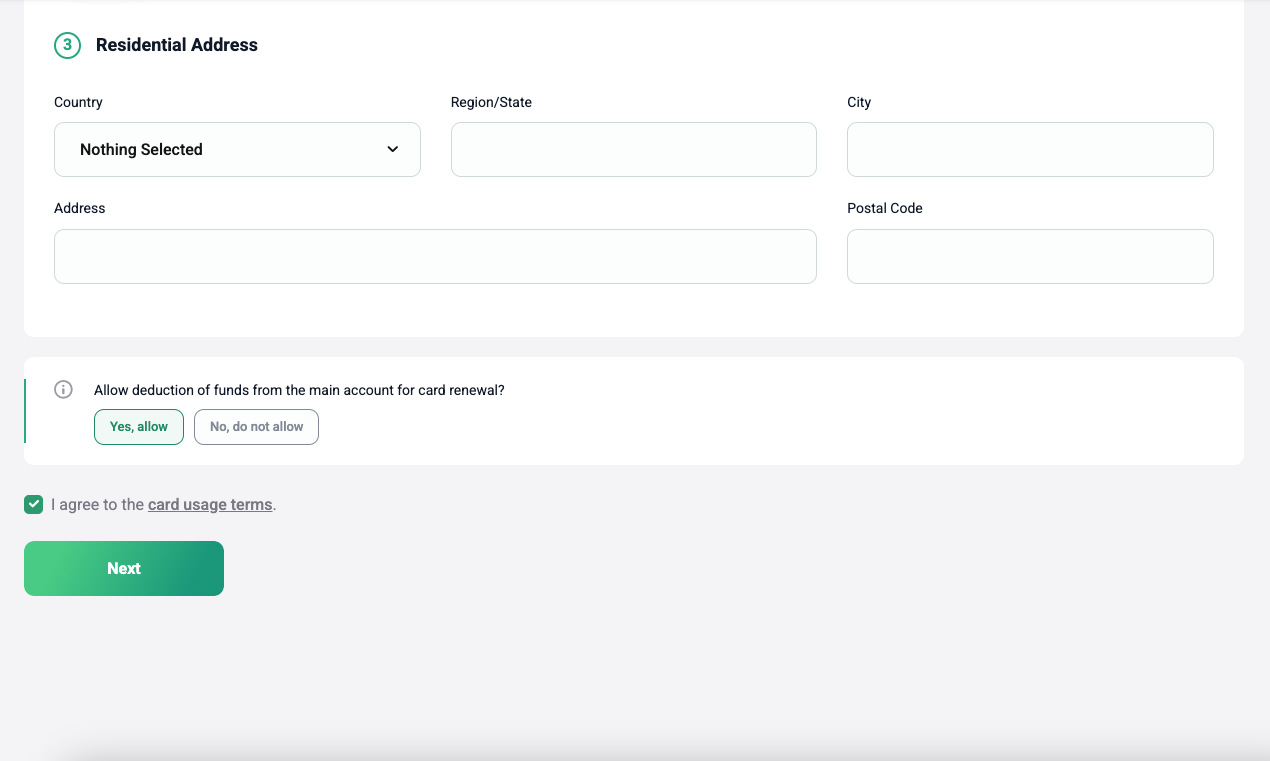
Enter Billing Information
- Full Name — provide your first name, last name, and patronymic.
- Date of Birth — use the format DD.MM.YYYY.
- Phone Number and Email — required for contact and verification.
- Address — include country, region, city, street, and postal code.
Use accurate details, as they’re needed for card issuance.
-
Pay for Card Issuance
- Select the account to debit for the issuance fee.
- For USD cards, use accounts with P2U (USD) or P2T (USDT).
- For EUR cards, use only P2E accounts.
- Choose a verification method (e.g., Google 2FA) and proceed.
-
Confirm Card Issuance
- Click “Next” to proceed to confirmation.
- Enter the 6-digit code from Google Authenticator.
- Click “Confirm” to finalize.
-
Complete the Process
- A message will confirm the card is being issued.
- Within 1–5 minutes, the card will appear in “My Cards” as “Active”.
Virtual Cards
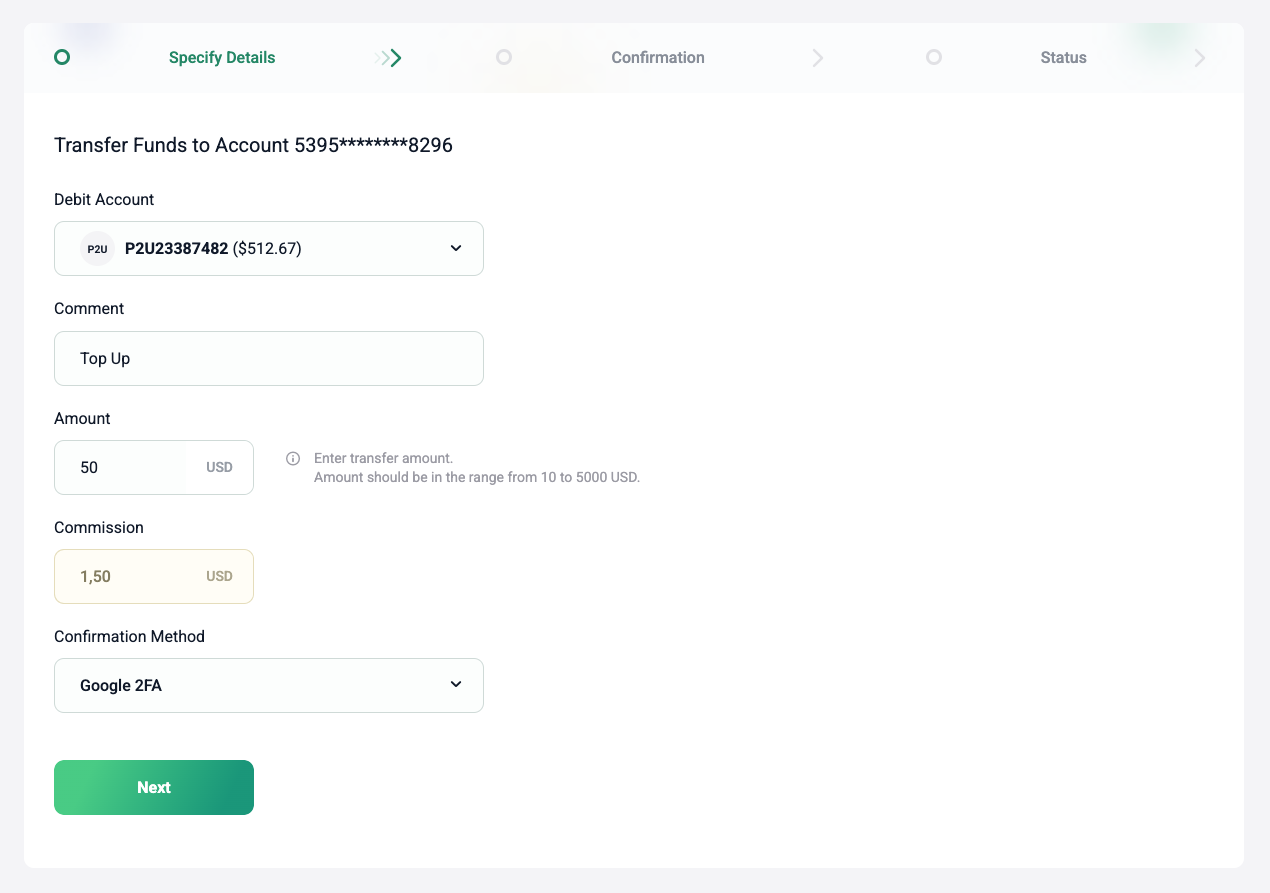
Funding a Card
Transfer funds from your internal account to any issued card. It’s quick and takes just a few minutes.
-
Select a Card
- Go to “My Cards”.
- Find the card and click “Top Up”.
-
Enter Funding Details
- Choose the account to debit.
- For USD cards, use P2U (USD) or P2T (USDT) accounts.
- For EUR cards, use only P2E accounts.
- Choose a verification method (e.g., Google 2FA).
-
Confirm the Transaction
- Click “Next”.
- Enter the 6-digit code from Google Authenticator.
- Click “Confirm”.
-
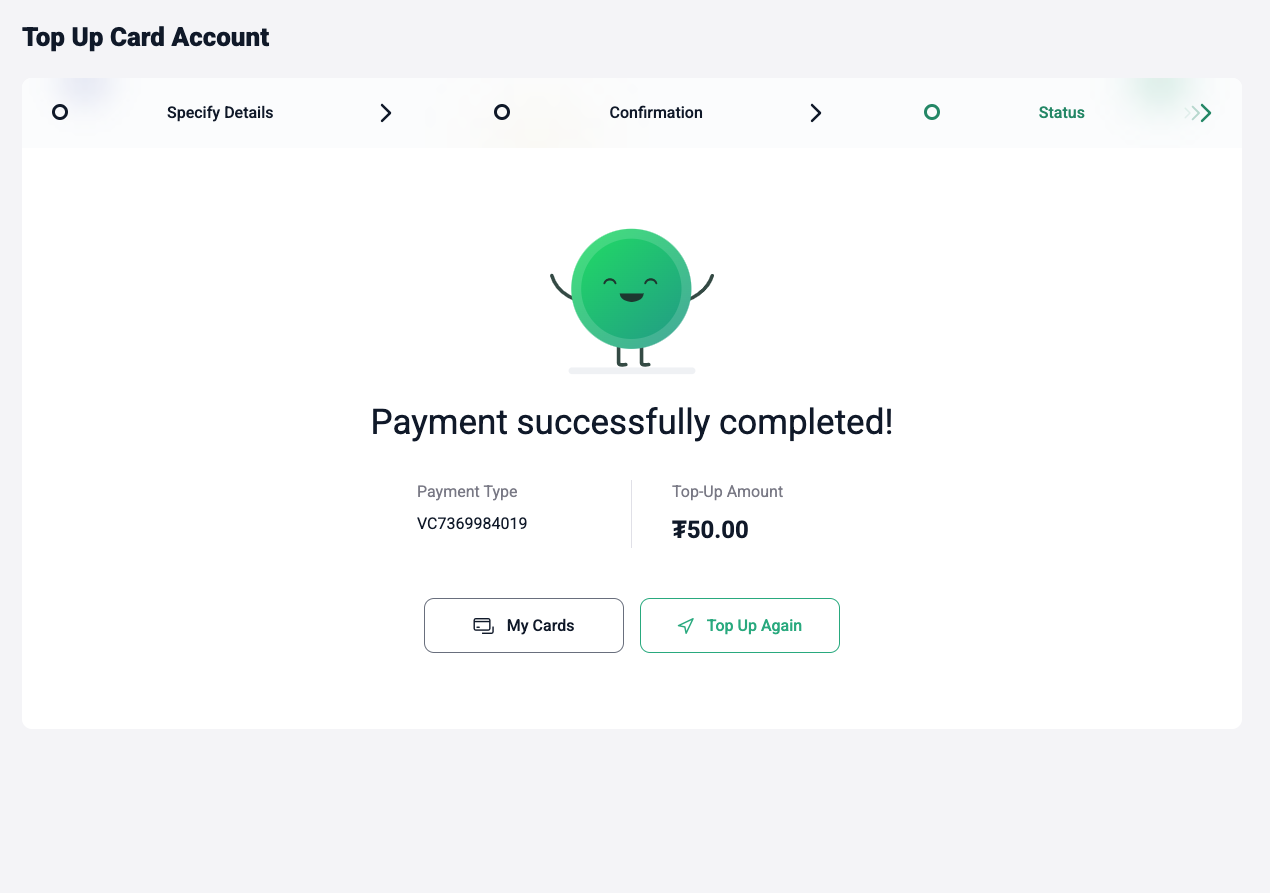
Complete the Process
- A message will confirm the payment is being processed.
- Funds will be credited to the card within 1–5 minutes.
Virtual Cards
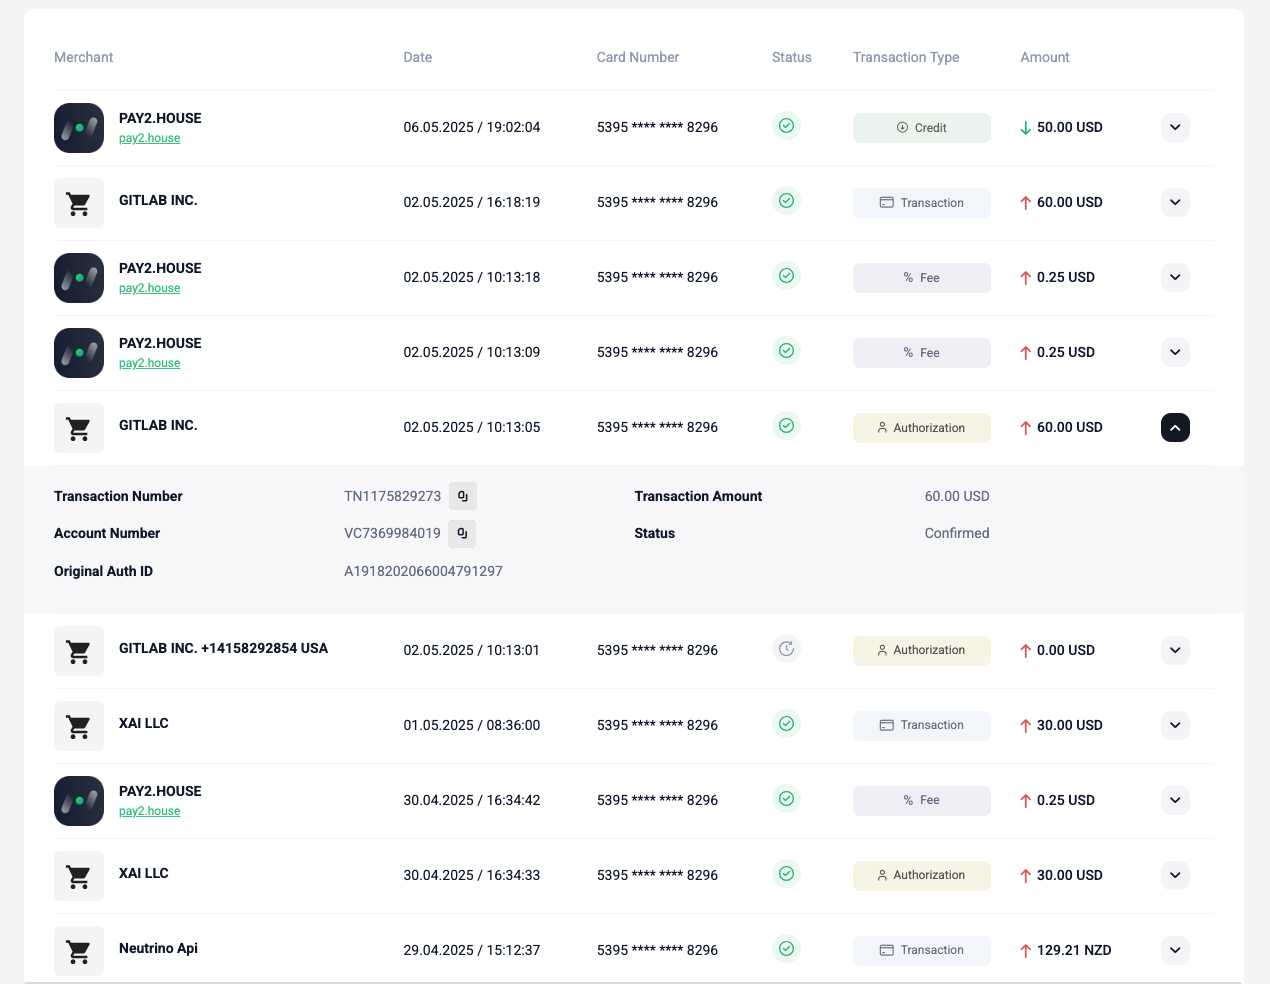
Transaction History
View all transactions made with your virtual card. This helps track spending, monitor payments, and analyze activity.
-
Access Transaction History
- Go to “My Cards”.
- Find the card and click “History”.
-
Use Filters for Search
- Date — select a specific day or range.
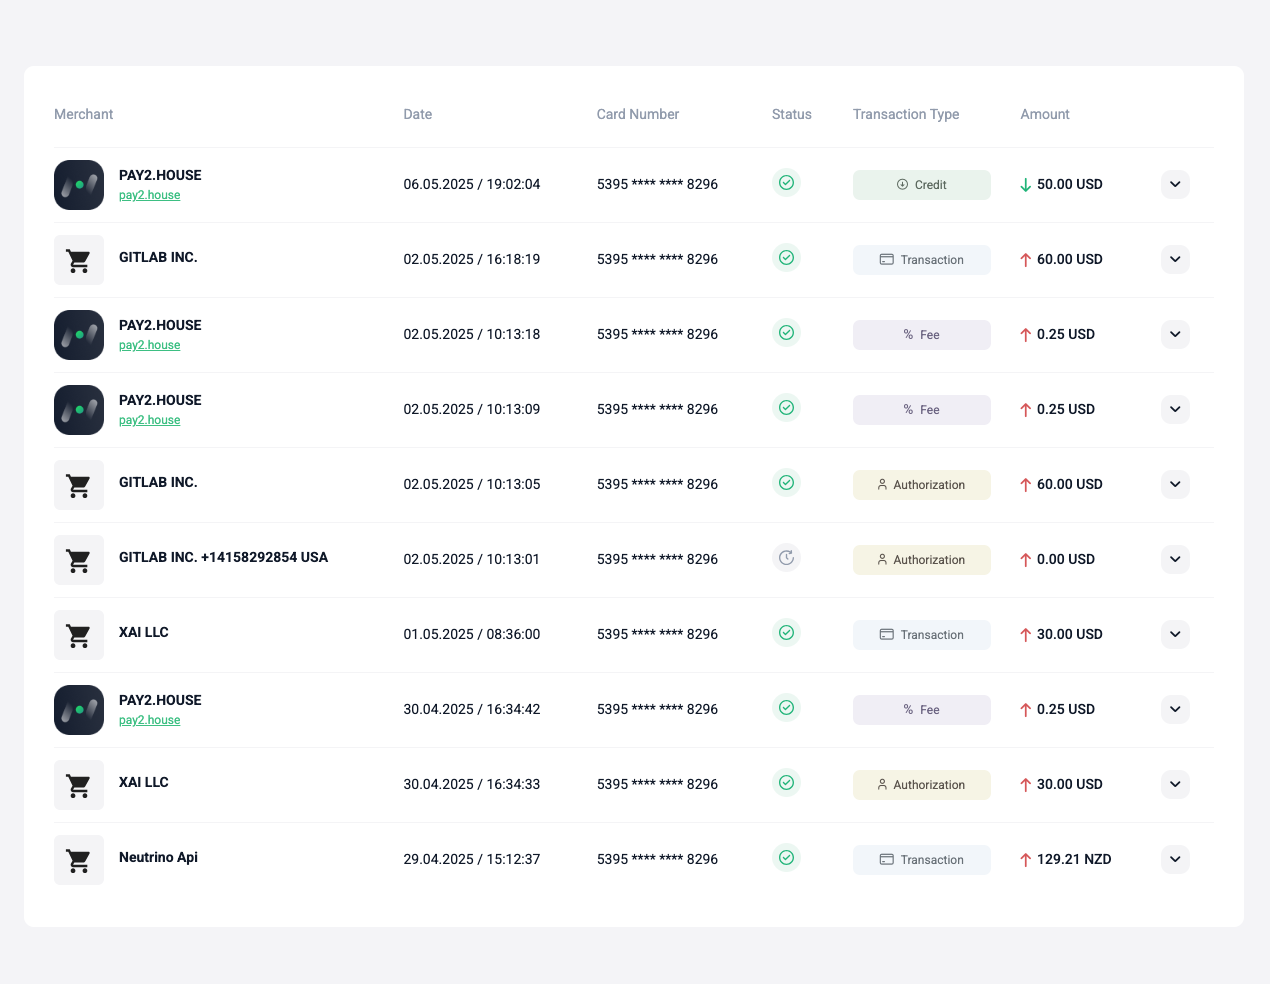
- Merchant — enter the store or service name (e.g., Google, Facebook, GitLab).
- Transaction — search by transaction ID.
Group by Status:
- All — all card transactions.
- Completed — successfully processed transactions.
- Declined — rejected transactions.
- Pending — transactions awaiting final status, which may take up to 14 days. This is normal and not an error.
-
Details for Each Transaction:
- Merchant — the store or service (e.g., Google, Amazon, Uber).
- Date and Time — when the transaction occurred.
- Card Number — displayed in masked format.
- Transaction Type — authorization, charge, refund, fee, etc.
- Amount — the charged amount in the purchase currency.
-
Transaction Details
Click the arrow next to a transaction to view more details:
- Transaction ID — unique transaction number in the system, useful for support or tracking.
- Account Number — the internal account linked to the card.
- Auth ID — authorization ID assigned by the bank.
- External ID — ID assigned by the payment system. Both IDs are critical for resolving disputes.
- Amount — exact amount charged in the card’s currency (USD or EUR), regardless of purchase currency.
Virtual Cards
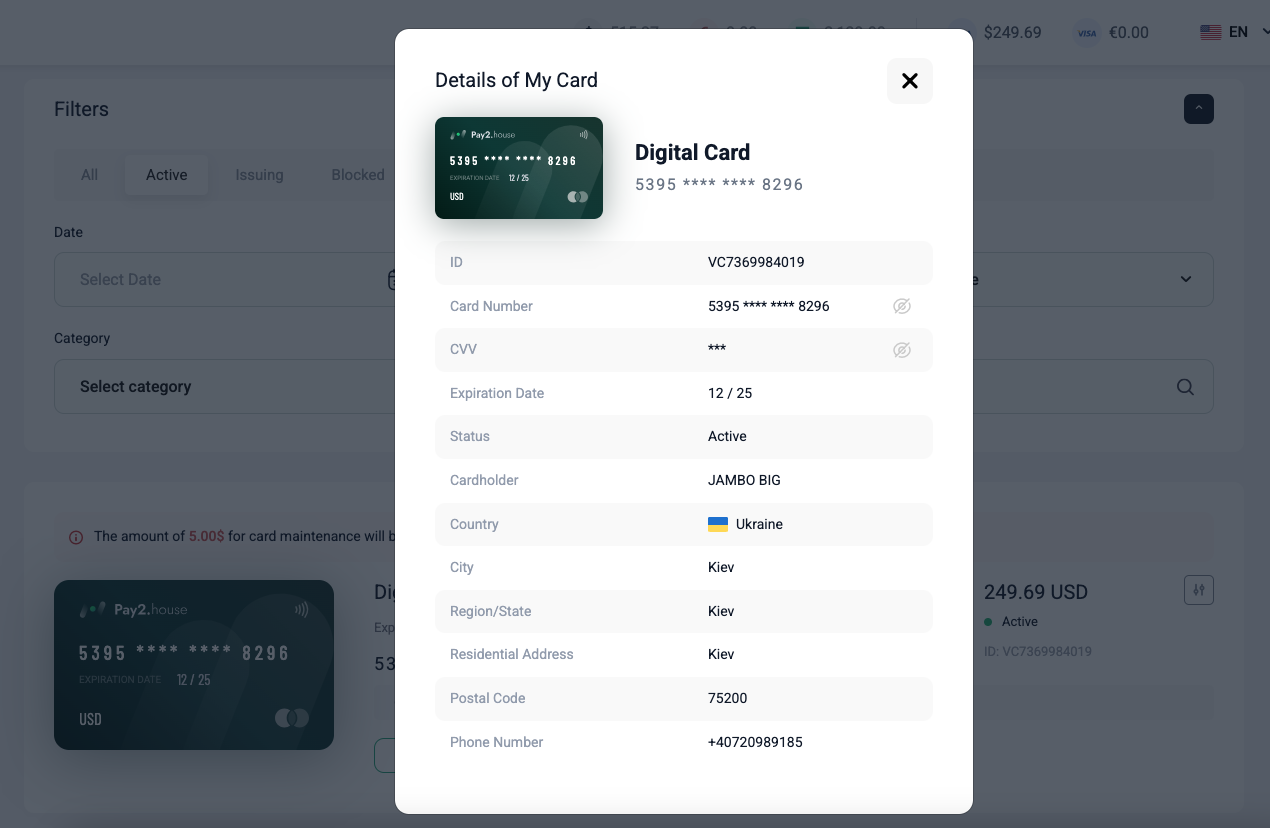
Card Details
View all details of your virtual card, necessary for online payments or transaction verification.
-
Access Card Details
- Go to “My Cards”.
- Find the card and click “Details” to open the information window.
-
Displayed Details:
- Card ID — unique card number in Pay2.House.
- Card Number — 16-digit number, partially shown initially, with full details available on click.
- CVV Code — 3-digit security code, hidden by default and shown only manually.
- Expiration Date — valid until (month/year).
- Status — current state (e.g., active, blocked, expired).
- Cardholder Name — name provided during issuance, as shown on the card.
- Issuing Country — used as the billing country for online purchases.
- Full Billing Address — country, region, city, street, and postal code provided at issuance, may be required by merchants.
- Phone Number — provided during issuance, used for confirmations or contact.
Virtual Cards
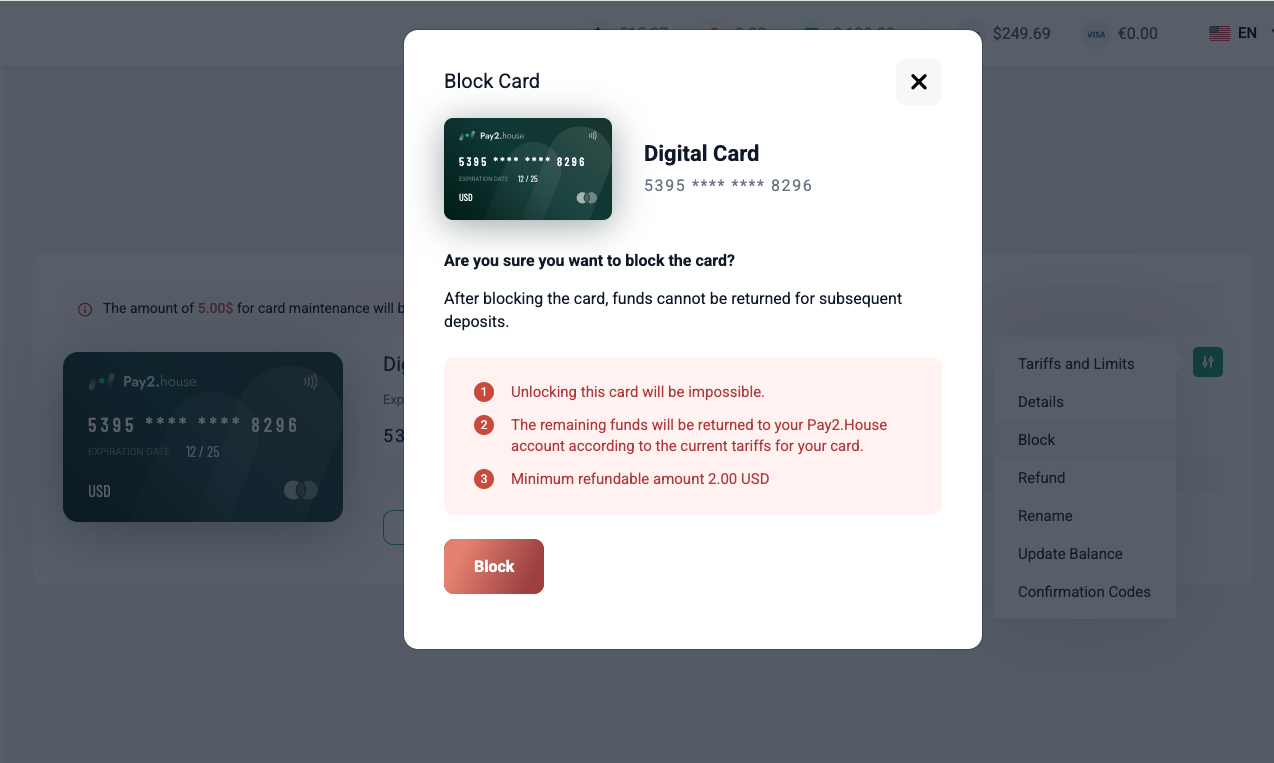
Blocking a Card
If you no longer plan to use a card, you can manually block it. This is irreversible, and you should understand the implications:
- The card becomes unusable for payments or transactions.
- Blocked cards cannot be reactivated.
- Remaining funds will be returned to your main account, subject to tariff conditions.
-
Open the Card List
- Go to “My Cards”.
- Locate the card you wish to block.
- Click the settings icon and select “Block”.
-
Confirm Blocking
- A warning will detail the refund conditions for any remaining balance.
- Review the information and confirm agreement with the terms.
- Click “Block” to proceed.
-
Complete the Process
- A message will confirm the card has been successfully blocked.
- The card will be removed from the active list and become unusable.
Virtual Cards
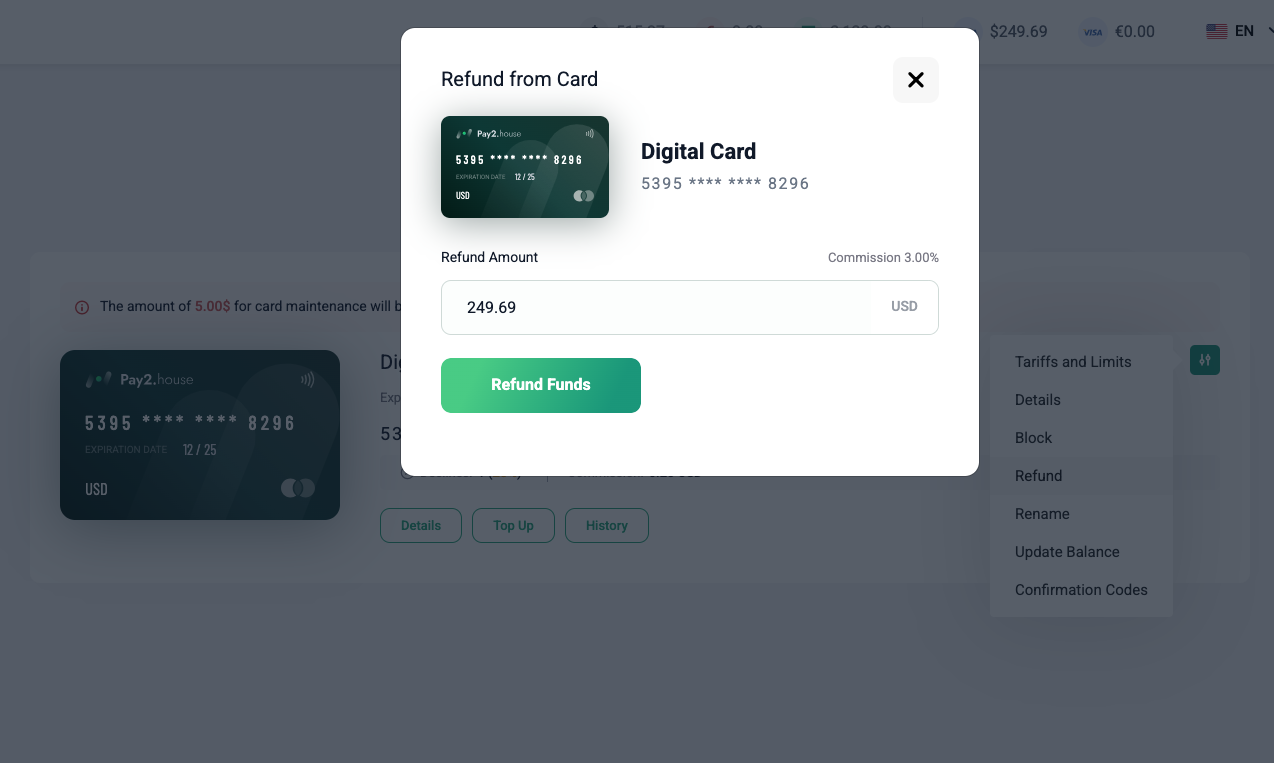
Refunding Funds from a Card
To return funds from a card to your main account, use the refund feature, available anytime there’s a balance.
Important: Refunds are only possible if the card has had no transactions in the last 14 days.
-
Select a Card
- Go to “My Cards”.
- Find the card and click the settings icon.
- Select “Refund”.
-
Check Available Amount
- A window will show the refundable amount and fee (e.g., 3%).
- The system will calculate the amount to be returned to your main account.
-
Confirm the Refund
- Click “Refund Funds”.
- The amount, minus the fee, will be deducted from the card and credited to your Pay2.House account.